Shipment Journal
Shipment Journal
Section titled “Shipment Journal”The Shipment Journal is a staging area where shipments are held before they are sent to the carrier platform. When a waybill is confirmed, a Shipment Journal entry is created automatically. From here, you can review the shipment details, make any last-minute adjustments, and then post the shipment to the carrier.
This gives you a chance to verify or change carrier settings — such as the shipping agent, service, printer, and carrier-specific options — before the shipment is actually booked with the carrier.
How to access the Shipment Journal
Section titled “How to access the Shipment Journal”You can open the Shipment Journal from the Role Centre using the Shipment Journals action, which is available on the following Role Centres:
- Inventory Manager
- Order Processor
- Shipping & Receiving
- Warehouse Worker
The Shipment Journal List shows all pending journal entries. Click on any entry to open the full Shipment Journal card for that shipment.
Workflow
Section titled “Workflow”The typical workflow for the Shipment Journal is:
- A waybill is confirmed on a Sales Order, Transfer Order, Service Order, or Warehouse Shipment
- A Shipment Journal entry is created automatically
- Open the Shipment Journal List from the Role Centre
- Review and adjust the journal entry as needed
- Click Post Shipment to send the shipment to the carrier platform
- The journal entry is deleted once posting is complete, and a Shipment Log entry is created
Fields on the Shipment Journal
Section titled “Fields on the Shipment Journal”General fields
Section titled “General fields”These fields appear on every Shipment Journal entry, regardless of which carrier platform is used.
| Field | Description |
|---|---|
| Shipment Platform | The carrier platform this shipment will be posted to (for example, Shipmondo). |
| No. | The unique journal number assigned automatically from the number series configured in Shipment Settings. |
| Shipping Agent Code | The carrier (shipping agent) to use for this shipment. This is required before posting. |
| Shipping Agent Service Code | The specific service level or product for the carrier (for example, a parcel service or express service). This is required before posting. |
| Shipment Printer | The printer to use when printing the carrier label. Defaults from the printer configured in Shipment Settings. |
| Source No. | The document number (Sales Order, Transfer Order, etc.) that this shipment originates from. |
Shipmondo-specific fields
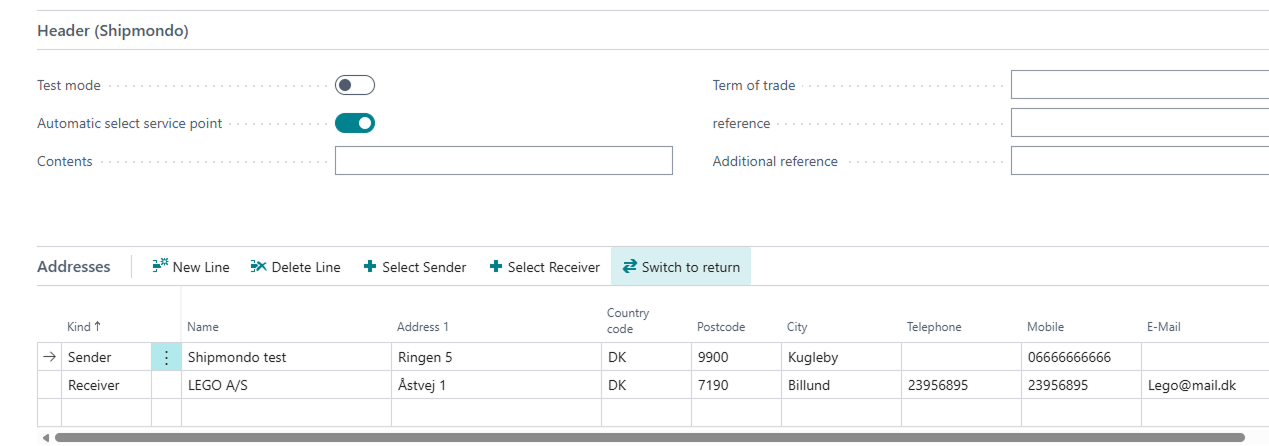
Section titled “Shipmondo-specific fields”When using the Shipmondo platform, additional fields are shown in the Shipment Journal - Shipmondo section of the journal card.
| Field | Description |
|---|---|
| Test mode | When enabled, the shipment is sent to Shipmondo’s test environment. Labels generated are dummy labels and cannot be used for real shipments. Disable this before going live. |
| Automatic select service point | When enabled, Shipmondo automatically selects the service point (parcel shop) closest to the receiver’s address. If a service point is manually selected, this is turned off automatically. |
| Contents | A general description of what is in the shipment (for example, Goods or Spare parts). Defaults from the Default Description in Shipment Settings. |
| Term of trade | The Incoterm for the shipment (for example, DAP or DDP). Used when customs information is required. |
| Reference | A reference that can be printed on the carrier label and transferred to the carrier (for example, Order 10001). |
| Additional reference | A secondary reference. When supported by the carrier, it is transmitted to the carrier and printed on the label. |
| Own agreement | Whether the shipment should be booked using your own carrier agreement rather than Shipmondo’s agreement. |
| Customer number | The customer number for the carrier agreement to use. Relevant when multiple agreements for the same carrier are configured. Only active when Own agreement is enabled. |
| Product code | The carrier product code for the shipment (for example, GLSDK_SD). This is filled in automatically when a Shipping Agent Service Code is selected. |
| Origin shipment id | The ID of the original outbound shipment that this shipment is a return for. Used when creating return shipments. |
| Whether the label should be sent to the print client automatically after posting. | |
| Label format | The format of the label to be printed (for example, PDF or ZPL). Only active when Print is enabled. |
Posting the shipment
Section titled “Posting the shipment”When you are ready to send the shipment to the carrier, click Post Shipment in the action bar at the top of the Shipment Journal card.
What happens when you post:
- The shipment data is serialised and sent to the carrier platform via the API
- The carrier books the shipment and returns a tracking number and label
- A Shipment Log entry is created with the tracking number, carrier, and service details
- The Shipment Journal entry is deleted
If posting fails, the journal entry remains open so you can correct any issues and try again.
- Missing Shipping Agent or Service Code — the journal will not post until both the Shipping Agent Code and Shipping Agent Service Code are filled in. These are marked as mandatory on the journal card.
- Test mode — if you are setting up a new carrier integration, use Test mode to verify that the shipment data is correct before sending real shipments.
- Printer setup — if no printer is shown, check that a default printer is configured in Shipment Settings for the relevant platform.