Guide to Shipment Connector functionality
Shipment Settings
Section titled “Shipment Settings”Shipment Settings is the page of which all of our settings, options and additional information is kept. This is also where you connect with the given Multi-Carrier Platform. From here you can setup your Sender Address information, Shipment Measurements, confirmation types and more.
To see how you connect to the individual Shipment Connectors please see their individual pages here:
Test Mode
Section titled “Test Mode”Test Mode allows you to connect to a carrier’s sandbox or test environment instead of the live production environment. This is useful when setting up a new connector, testing carrier integrations, or validating your configuration without creating real shipments or incurring charges.
- When Test Mode is enabled, the connector uses a separate set of test credentials — Test API User, Test API Key, and Test API URL — instead of your live credentials. Any shipments created will be sent to the carrier’s test environment only.
- When Test Mode is disabled, the connector uses your live credentials and all shipments are real.
- Test Mode is configured per connector, so each connector has its own independent Test Mode setting.
- Use Test Mode during initial setup and when testing new carrier services or configurations.
- Remember to disable Test Mode before going live — leaving it enabled means no real shipments will be booked, even if everything else appears to be working correctly.
Create Waybill with Document Header
Section titled “Create Waybill with Document Header”The Create Waybill with Document Header setting controls whether a waybill is created automatically when a source document is created in Business Central, or whether the user must trigger waybill creation manually.
- When enabled, a waybill is automatically created at the same time as the source document (Sales Order, Transfer Order, or Service Order). Users do not need to click New Waybill — it appears on the document immediately.
- When disabled (the default), waybill creation is manual. Users must open the document and trigger it via Actions > Shipment > New Waybill or the Shipment ribbon.
- This is a global setting that applies to all documents processed through the connector.
- Consider enabling this in high-volume environments where every order requires a shipment label, as it removes a manual step from the process.
- Consider leaving it disabled if not all orders require a shipment — for example, if some orders are collected in person or handled through a different process — so that waybills are only created when actually needed.
Pick-up Times and Instructions
Section titled “Pick-up Times and Instructions”The Pick-up Times and Instructions settings let you define a standard carrier pick-up window and any special instructions for the carrier. These settings are configured on the Shipment Settings page and are automatically applied to new waybills when enabled.
The following fields are available:
- Use Pick-up — A toggle that enables automatic pick-up scheduling. When this is turned on, the pick-up time and instruction fields below are automatically copied to the Pick-up Information section on the Waybill Header whenever a new waybill is created.
- Pick-up from Time — The start time of the carrier’s pick-up window (for example, 13:00).
- Pick-up to Time — The end time of the carrier’s pick-up window (for example, 16:00).
- Pick-up Instruction — A free-text field for any special instructions for the carrier (for example, Ring doorbell or Use side entrance).
When to use this: If your carrier collects shipments at the same fixed times each day, enabling Use Pick-up saves you from having to fill in the pick-up window on every waybill manually. Set your standard pick-up window once in Shipment Settings and it will be pre-populated on all new waybills automatically.
Where to configure: Open Shipment Settings and locate the pick-up fields in the setup area.
Reference Mask and Pre/Suffix
Section titled “Reference Mask and Pre/Suffix”The Reference Mask and Reference Pre/Suffix fields on the Shipment Settings page let you control exactly how the order or document number appears as the carrier reference on the waybill.
- Reference Mask — extracts a specific segment from the External Reference field using a
%-delimited pattern. For example, if your order number isSO-2024-001and you only want001to appear on the carrier label, a mask of%-%-%tells the system to extract the third segment. The number of%characters determines which segment is used. - Reference Pre/Suffix — adds a fixed piece of text before or after the extracted (or original) reference. For example, entering
ORDER-would result in the reference appearing asORDER-001on the label. - When to use these settings: Use them when your order numbers contain prefixes, year segments, or other parts that should not appear on the carrier label — for example, when the carrier only needs a short numeric reference rather than your full internal document number.
- If neither field is configured, the External Reference is forwarded to the carrier as-is.
Default Package Description
Section titled “Default Package Description”The Default Description field on the Shipment Settings page lets you define a standard package description that is automatically filled in on new Waybill Lines when a waybill is created.
- When a new waybill is created, the Default Description is automatically inserted as the Package Description on each Waybill Line — saving you from having to type it manually every time.
- If a Package Type is selected on the Waybill Line and that Package Type has its own description defined, the Package Type description takes precedence and the default is not used.
- When to use this: Set a Default Description when you always ship the same type of goods and want a consistent package description on every waybill without manual entry — for example, General merchandise or Spare parts.
Field Mask List
Section titled “Field Mask List”The Field Mask List is a setup page that lets you define your own custom formatting rules for values — such as Postal Codes and Shipping Methods — before they are sent to the carrier.
- Where to configure: Open the Field Mask List page from the Shipment Connector setup and add a rule for the field you want to control the format of.
- Default behaviour: No rules exist by default. Until you add one, values such as Postal Codes are forwarded to the carrier exactly as entered in Business Central, with no automatic shortening or reformatting applied.
- When to use this: If a specific carrier requires a particular Postal Code format (or a specific format for a Shipping Method value), add a rule here so the correct formatting is applied automatically whenever a waybill is sent.
Shipment Sender information
Section titled “Shipment Sender information”On the Shipment Settings Page you can set what your Ship-from address information should be. You have the choice of using the default address fields from Company information, the Shipping fields, create a completely custom address to be used or use your locations addresses which allows you to ship from multiple warehouses in the same environment.
Receiver & billing information
Section titled “Receiver & billing information”We utilise as much as standard Business Central as possible and for receiver (and billing) information this is no different.
Default (Sell-to Address)
Section titled “Default (Sell-to Address)”Your receiver information will always correnspond to your ship-to fields in Business Central, by default this is always set to be equal to your sell-to information on a Sales Order.
Alternate Shipping Address
Section titled “Alternate Shipping Address”If you select an Alternate Shipping Address all of the fields from Alternate Shipping Address Card will be utilised this includes Phone no. - E-mail & even choice of Shipping Agent & Shipping Agent service.
Custom Address
Section titled “Custom Address”If you select a Custom Receiver Address these fields will be used for receiver information except e-mail as there is no standard Business Central field for this when using a Custom Address - so therefore we are forced to use the Sales header email (sell-to) - We have requested for Microsoft to add this since they added the Ship-to Phone no. field, however, they did not believe it necessary. If you or your Business Central Partner want to add a custom field for this we have an EventSubscribers you can use to easily adjust our integrations to use your custom field.
Ship-to Information
Section titled “Ship-to Information”When a waybill is created, the system automatically fills in the Ship-to (receiver) address based on the source document. The fields used depend on which type of document the shipment originates from.

Sales Orders and Posted Sales Shipments
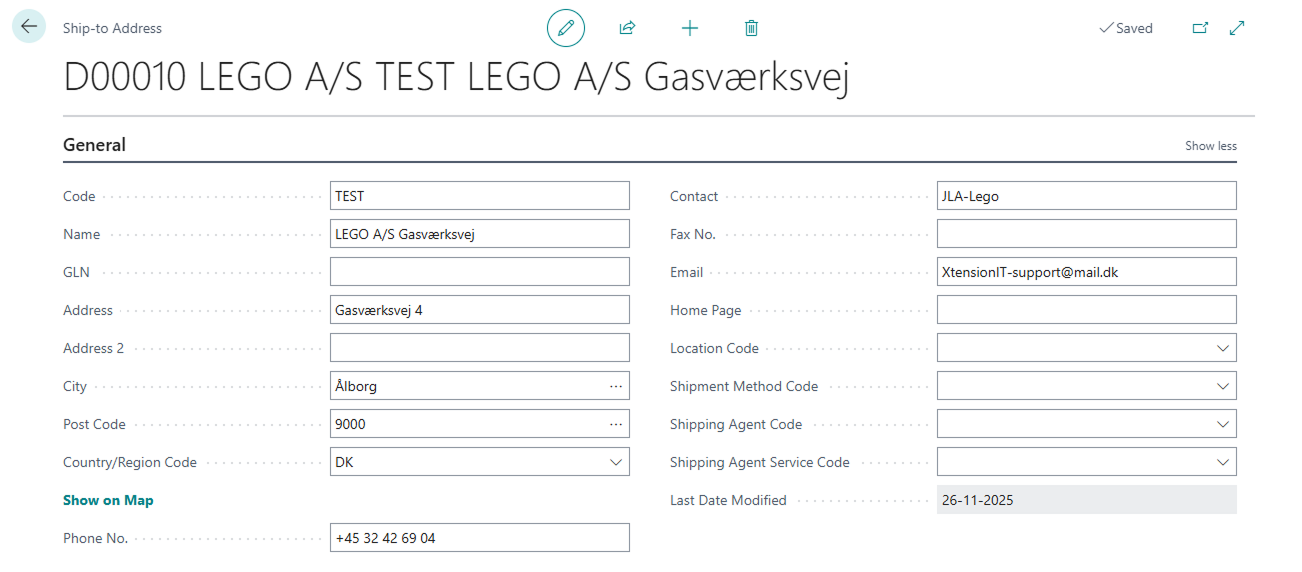
Section titled “Sales Orders and Posted Sales Shipments”- If the Sales Order has an Alternate Shipping Address (Ship-to Code) selected, the system reads the address details — including Name, Address, City, Post Code, Country, Contact, Phone, and Email — directly from the Alternate Shipping Address Card for that customer.
- If no Alternate Shipping Address is set, the system uses the Ship-to fields on the Sales Order itself. In standard Business Central, these default to the customer’s (Sell-to) address.
- For contact details (name, phone, and email), the system first tries to look up the contact via the Sell-to Contact No. on the order. If no matching contact record is found, it falls back to the Sell-to Email and Sell-to Phone No. from the order header.
- For individual address fields (Name, Address, City, Post Code, Country), the system prefers the Ship-to value but will fall back to the corresponding Sell-to value if the Ship-to field is blank.
Service Orders
Section titled “Service Orders”- The Ship-to address is taken directly from the Ship-to fields on the Service Header.
- Service Orders have their own dedicated Ship-to Email, Ship-to Phone, and Ship-to Phone 2 fields — unlike Sales Orders, which fall back to the Sell-to email when no Ship-to email is available.
- Contact information is resolved via the Contact No. on the Service Header.
Transfer Orders
Section titled “Transfer Orders”- The receiver address is taken from the Transfer-to fields on the Transfer Header (Transfer-to Name, Address, City, Post Code, and Country).
- Phone and Email are retrieved from the Location record for the Transfer-to location code.
- Transfer Orders do not have a customer number or VAT registration, so those fields will not be populated on the waybill.
Warehouse Shipments
Section titled “Warehouse Shipments”- A Warehouse Shipment does not have its own Ship-to address. Instead, the system looks at the source document linked to the first Warehouse Shipment Line — which may be a Sales Order, Service Order, or Transfer Order.
- The Ship-to address shown on the waybill is therefore determined by the rules of the underlying source document, as described above.
Skipping Shipments
Section titled “Skipping Shipments”There are two independent ways to prevent a shipment from being processed. Either condition alone is enough — if either applies to a document, no waybill will be sent to the carrier.
Skip Shipment flag on a Shipment Method
Section titled “Skip Shipment flag on a Shipment Method”On the Shipment Methods list (accessible from the Shipment Connector setup), each Shipment Method has a Skip Shipment checkbox. When this is enabled for a Shipment Method, any document that uses that Shipment Method Code will be skipped automatically — no waybill will be created or sent to the carrier for it.
This is a global setting per Shipment Method code, meaning it applies to all documents that use that method. A typical use case would be a shipment method such as PICKUP or COLLECT, where the customer collects the goods themselves and no carrier label is needed.
No Shipment value on the document
Section titled “No Shipment value on the document”On individual documents — Sales Orders, Transfer Orders, Service Orders, and Warehouse Shipments — there is a Shipment Type field located next to the Shipment Method Code field. This field has three options:
- Default — normal shipment processing (standard behaviour)
- No Shipment — no waybill will be created or sent for this specific document
- Drop Shipment — the sender address is replaced by the vendor’s address, used when a vendor ships directly to the customer
Setting No Shipment on a document prevents waybill creation for that document only, regardless of which Shipment Method is used. This is a per-document setting and does not affect any other orders or shipments.
Drop Shipment
Section titled “Drop Shipment”Drop Shipment is a value on the Shipment Type field, available on Sales Orders, Transfer Orders, Service Orders, and Warehouse Shipments. You will find this field next to the Shipment Method Code field on the document. If the field is not immediately visible, it may be hidden under Show more.
When to use Drop Shipment
Section titled “When to use Drop Shipment”Use Drop Shipment when your customer is reselling goods to their own customer, and the item ships directly from your warehouse to your customer’s end customer:
- Your company sells an item to your customer (the Sell-to party)
- The item ships directly from your warehouse to your customer’s customer (the Ship-to receiver)
- The carrier label should show your customer’s (Sell-to) address as the sender — so the shipment appears to originate from your customer, not from your warehouse
- The pick-up address remains your warehouse — only the sender name and address on the label changes
What happens when Drop Shipment is set
Section titled “What happens when Drop Shipment is set”When the Shipment Type field is set to Drop Shipment on a document, the system replaces the sender (Ship-from) address on the waybill with the Sell-to address from the Sales Order — that is, the customer’s own address.
- The sender address on the waybill is replaced by the customer’s (Sell-to) address
- The receiver address (Ship-to) is not changed — it still points to the delivery destination as normal
- The shipment is still processed and a carrier label is still generated — the document is not skipped
What is not affected
Section titled “What is not affected”- The receiver (Ship-to) address remains unchanged
- The shipment is processed normally — a carrier label is generated and sent to the carrier
- All other waybill fields (measurements, package types, services, etc.) are unaffected
Shipment Measurements
Section titled “Shipment Measurements”You can select between different metrics such as grams for weight, Meter & millimeter for dimensions allowing for greater flexibility, this will also update the tooltips on your waybill lines (this requires a refresh of the browser to take effect after changing it) The dimensions can be changed on the shipment settings page under the shipment measurements segment.

Volume (m³)
Section titled “Volume (m³)”The Volume field on Waybill Lines is automatically calculated from the package dimensions you enter — you do not need to fill it in manually.
- The formula used is: Length × Width × Height ÷ 1,000,000 = Volume in m³ (where dimensions are entered in centimetres).
- The calculated volume is forwarded to the carrier as part of the shipment data.
- When it matters: Some carriers use volumetric weight for freight calculation — meaning a large but light package may be charged based on its volume rather than its actual weight. Having the correct dimensions on the Waybill Line ensures the carrier receives accurate volumetric data.
Weight Split Behaviour
Section titled “Weight Split Behaviour”The Split Weight On field on the Shipment Settings page controls how weight is recalculated on a Waybill Line when the number of packages (Colli Quantity) changes.
The field has two options:
- Colli — the per-package weight (Colli Weight) is the fixed value. When the Colli Quantity is changed, the Total Weight is recalculated automatically as Colli Weight × Colli Quantity. Use this option when you know the weight of each individual package.
- Total — the total shipment weight (Total Weight) is the fixed value. When the Colli Quantity is changed, the Colli Weight is recalculated automatically as Total Weight ÷ Colli Quantity. Use this option when you know the combined weight of the entire shipment and want the system to distribute it evenly across packages.
When to use each option: Choose Colli if you weigh packages individually before shipping. Choose Total if you weigh the entire shipment at once and want the per-package weight derived from that total.
Waybills & Shipments
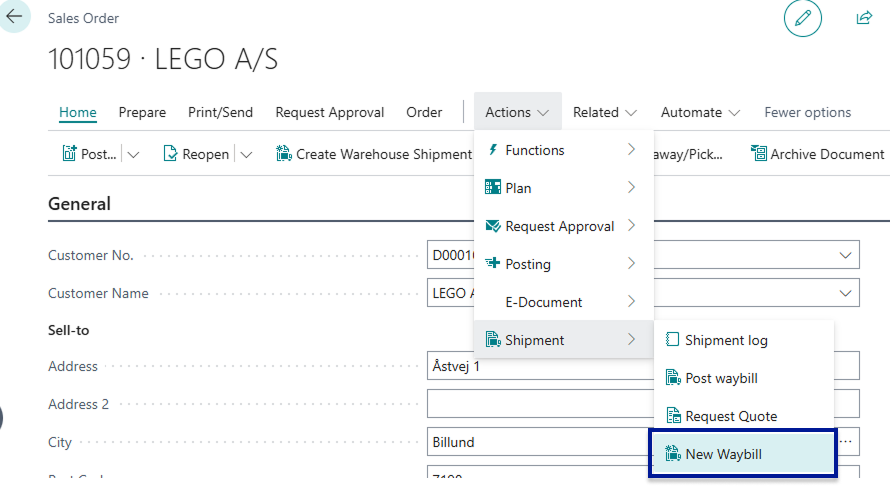
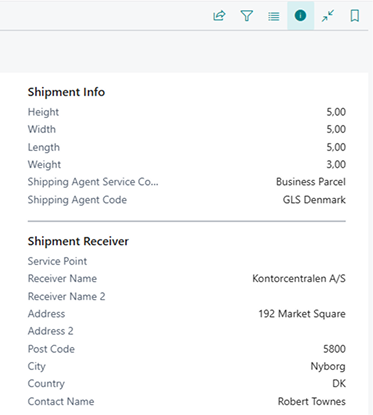
Section titled “Waybills & Shipments”Each of the Shipment Connectors utilises a Waybill to store the information that is forwarded to the Shipping Agent/Carrier. The relationship between Waybills and orders are 1 to 1. For each order one waybill is created. The only exception is for documents that existed prior to the installation of the Shipment Connector - For these pre-existing documents users will have to manually create a Waybill which can be done by opening the given document and navigating to the following Actions > Shipment > New Waybill.
It is also on the Waybill that the parcel information which is forwarded to the shipping agent is entered. The Waybill consists of a Shipping Agent/Carrier, an associated Shipping Agent Service, order reference no. and optionally a pick-up point ID, and receiver description.
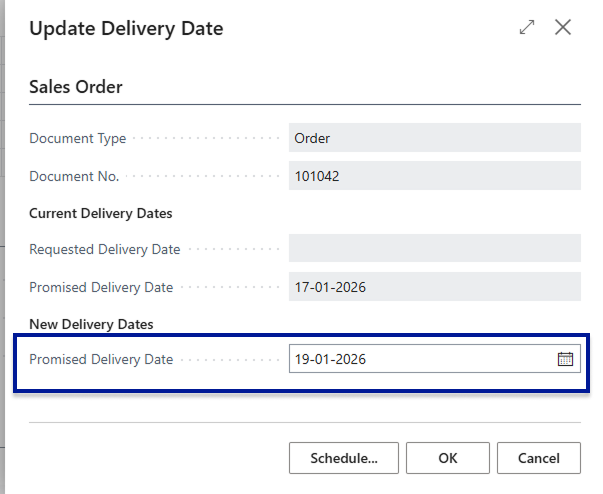
We also have two sections for Pick-up information and Ship-to information where you can enter when you want you shipments to be picked up and at which time as well, along with when the desired delivery time and date of the shipment. If you are Shipping from Sales Orders then you can use the standard Business Central fields Requested and promised Delivery (Primised Delivery Date > Requested Delivery Date) date to assign a delivery date for the shipment.
For warehouse shipments we have added a field called delivery date under the Shipment section where you can change the delivery date.

By default we aim to utilise as much as Standard Business Central as possible so if you have setup a standard shipping agent and shipping agent service on your Customers In Business Central these fields are filled out in the Waybill Header automatically - it is essential that a shipping agent and a shipping agent service is specified and set up properly on the waybill that is being handled otherwise it is not possible to forward the relevant information to the Multi-carrier platform and thereby the carrier itself.

Shipment Log
Section titled “Shipment Log”The Shipment Log records every posting attempt made for a given document — whether it succeeded or failed. It is the primary tool for troubleshooting shipment issues and auditing what has been sent to the carrier.
The Shipment Log is available on all document types supported by the Shipment Connector:
- Sales Orders
- Transfer Orders
- Service Orders
- Warehouse Shipments
- Posted Sales Shipments
- Posted Transfer Shipments
Accessing the Shipment Log
Section titled “Accessing the Shipment Log”Open the relevant document and select Shipment Log from the Shipment ribbon or actions area. You can also use the keyboard shortcut Alt+L to open the log directly.
What the log shows
Section titled “What the log shows”Each entry in the Shipment Log contains the following information:
- Order number — the source document the shipment relates to
- Shipment number — the waybill or carrier booking reference
- External document number — the reference sent to the carrier platform
- Receiver information — the name and address the shipment was sent to
- Tracking data — the tracking number(s) returned by the carrier
- Posting date and time — when the posting attempt was made
- Status — whether the posting was successful or resulted in an error
- Error message — if the posting failed, the error message returned is shown here
When to use the Shipment Log
Section titled “When to use the Shipment Log”- Troubleshooting failed shipments — if a waybill did not post correctly, the log shows the exact error message returned by the carrier or platform, making it easier to identify and resolve the issue
- Auditing shipment history — review all posting attempts for a document, including any retries, to get a full picture of what was sent and when
- Finding tracking numbers — the log contains the tracking numbers returned after a successful posting, useful if the tracking number needs to be located quickly
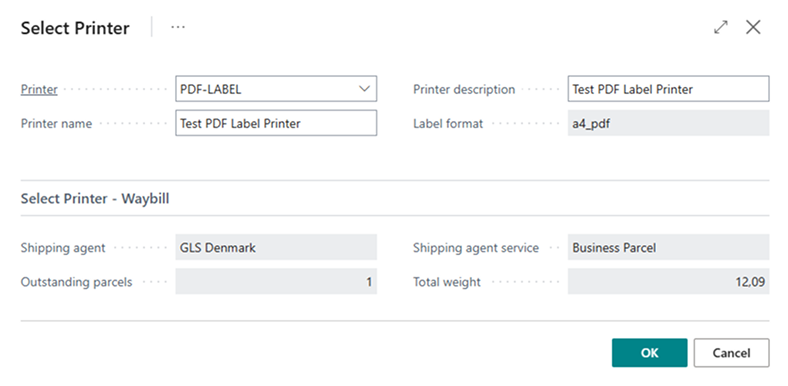
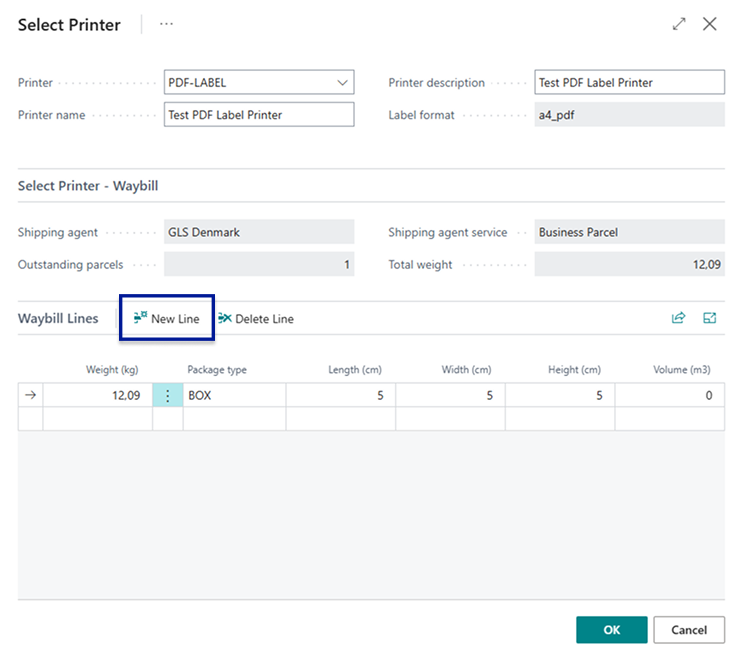
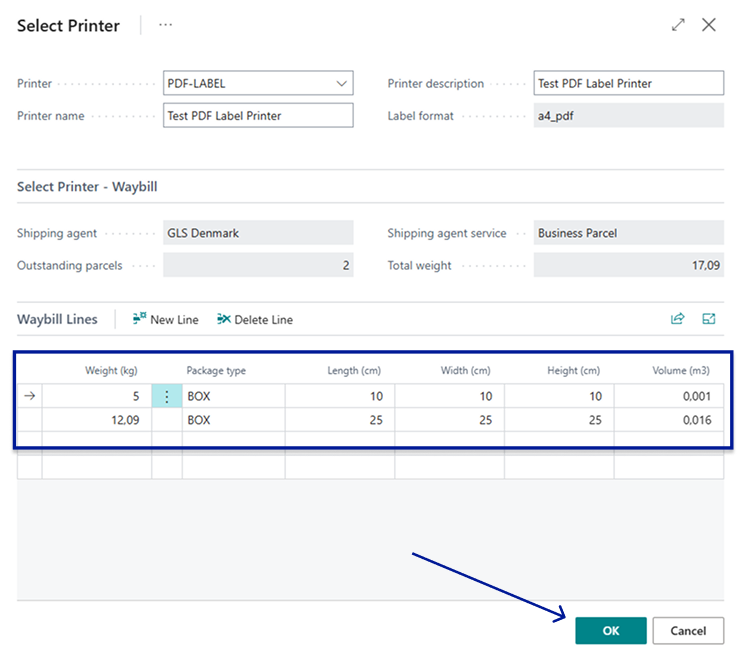
Posting The Waybill
Section titled “Posting The Waybill”The most essential function in the Shipment Connectors is transferring Shipment Data to the multi-carrier Platform, through to the given carrier thereby booking the shipment and printing the requested labels. While there is not inherently intended a specific process for when to use the Waybill as it is flexible and can be used both pre-posting and after posting of documents, and is therefore likely to cover the majority of different business’ and their various process along with that - We do envision the Waybill as the finalising part of the picking process once picking is completed for an order.
Once the pick has been completed, you have selected your given Shipping Agent & shipping agent service you can enter the amount of packages/pallets/colli you are shipping on the Waybill Header section and and enter the package type, weight and dimensions. Once this data has been entered you can navigate to Actions > Shipment > Post Waybill or via the shortcutkey Alt + P. This will then transfer the data from Business Central to the Multi-carrier platform and the requested labels will be printed to the designated printer immediately.
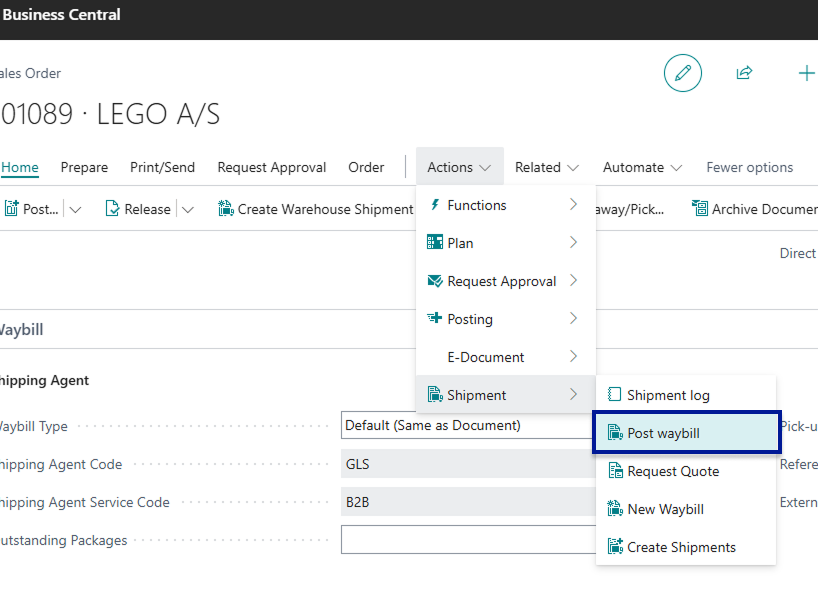
You can tell a Waybill Line has been posted by its status which changes from Open to Reserved.
Hidden Fields on Waybill Header and Waybill Lines
Section titled “Hidden Fields on Waybill Header and Waybill Lines”The Waybill Header and Waybill Lines contain a number of additional fields that are hidden by default. These fields are not shown in the standard page layout but can be made visible using Business Central’s standard Personalise functionality. To show hidden fields, click the gear icon (⚙) in the top-right corner of the page and select Personalise, then use Show more fields on the relevant FastTab, or drag fields into view from the field list.
Waybill Header Hidden Fields
Section titled “Waybill Header Hidden Fields”The following fields on the Waybill Header are hidden by default but may be relevant depending on your setup:
- Receiver Description — A free-text delivery instruction forwarded to the carrier. Note that this field is pending obsolescence; its functionality has been moved to the Ship-to Information group on the Waybill Header, and the corresponding field there should be used going forward.
- Carrier Code — The internal carrier code used for platform integration (e.g. Shipmondo). This is a technical integration field and is generally not required for day-to-day use.
- Ship-to Post Code — The postal code of the ship-to address. This field is used internally for pick-up point filtering and is populated automatically from the order.
Waybill Lines Hidden Fields
Section titled “Waybill Lines Hidden Fields”The following fields on the Waybill Lines are hidden by default but may be useful depending on your shipping requirements:
- Return Quantity — The number of colli remaining to be returned. Relevant when pallet exchange is configured for the shipping service.
- Colli Quantity — The number of colli (packages) on the line. Useful for verifying the quantity per line when working with multi-colli shipments.
- Total Weight — The total weight of the line, calculated automatically as Colli Weight × Colli Quantity. Shown for reference; the value is maintained by the system.
- Package Description — A free-text description of the parcel contents (for example: Bike accessories). This description is forwarded to the carrier.
- Insurance Amount — The insurance value (in local currency) for the line. Only relevant when the selected shipping service requires insurance to be declared.
- Cash on Delivery Amount — The cash on delivery amount (in local currency) for the line. Only relevant when the selected shipping service supports cash on delivery.
- Loading Meter — The loading metre value for the line, calculated automatically from the package dimensions. Shown for reference.
- Package Tracking No. — The carrier’s package tracking number for the line. This field is populated automatically after the Waybill has been posted.
- External Reference — An external reference code copied from the Waybill Header. This field is read-only on the lines.
Printer setup
Section titled “Printer setup”Printers can be designated in a couple of ways.
- You can setup a printer under Shipment Settings which will then be used by everyone posting a waybill
- However, if you would like to control it on an individual level we have added a shipment printer field on the user settings page from which you can designate a printer to a specific user. This will always be prioritised over the printer specified under shipment settings.
To see more information about downloading printers into Business Central you will have to check out the individual setup pages for the given Multi-Carrier platform that you are working with - see links below for more.
Shipping Agent & Shipping Service Setup
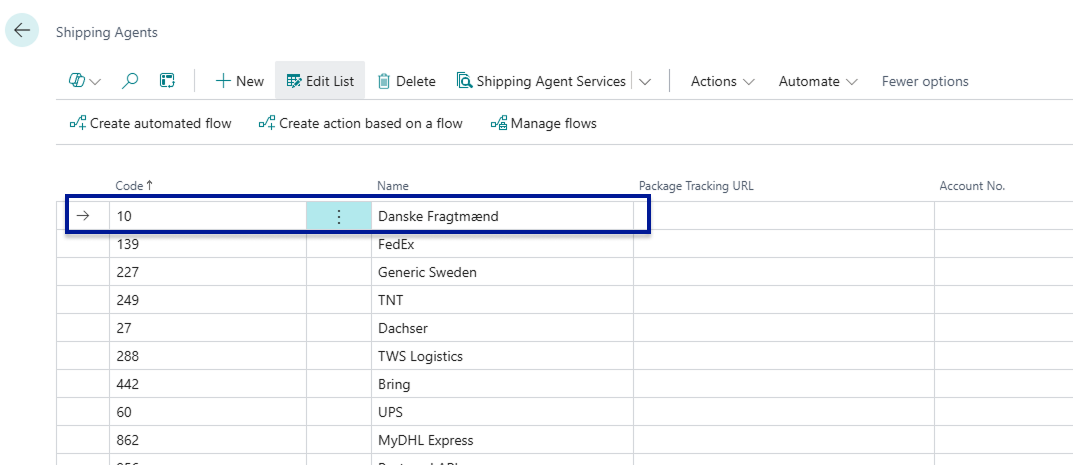
Section titled “Shipping Agent & Shipping Service Setup”When you have downloaded your Shipping Agent & Shipping Agent Service data into Business Central they will be given an ID in the Code field which is standard to Business Central, this field can always be changed without fear of breaking the connection between BC data and Multi-Carrier platform. The same goes for the code of the Shipping Agent Service
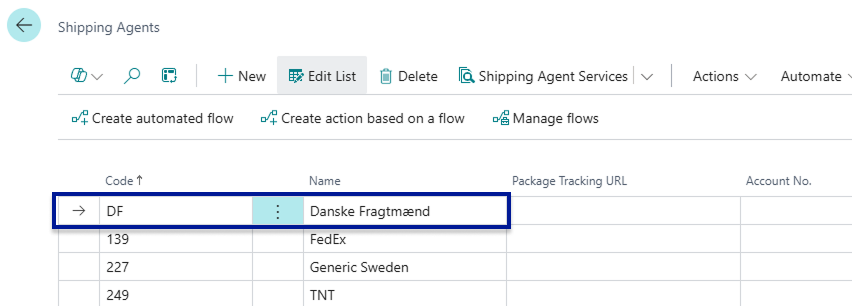
An example of this could be that when downloaded from Multi-Carrier Platform into Business Central a carrier such as Danske Fragtmænd may get a Code of 10. However, we can change this as we see fit for instance into DF - Remember the Code field only holds 10 characters.
Before:
After:
Default Shipping Agent and Service
Section titled “Default Shipping Agent and Service”Each Shipping Agent in Business Central has a Default checkbox, and each Shipping Agent Service also has its own Default checkbox. These settings control which carrier and service are automatically pre-selected when a new waybill is created.
When a new waybill is created for a document, the system reads the Shipping Agent Code from the source document (Sales Order, Transfer Order, etc.). If the document already has a Shipping Agent Code set, that agent is used on the waybill. If no specific Shipping Agent Service is set on the document, the system automatically selects the service that is marked as Default for that agent — so users do not have to manually pick a service every time.
- The Default checkbox on a Shipping Agent marks that carrier as the primary carrier to use when no other agent is specified.
- The Default checkbox on a Shipping Agent Service marks that service as the fallback service for its parent agent when no service is specified on the document.
- Only one Shipping Agent should be marked as Default, and only one Service per agent should be marked as Default.
Waybill Carrier Selection
Section titled “Waybill Carrier Selection”On the Waybill Header, there is a Waybill Type field that controls how the Shipping Agent and Shipping Agent Service are determined for that specific waybill. This field has two options:
- Default (Same as Document) — The Shipping Agent and Shipping Agent Service on the waybill are locked to whatever is set on the source document. The user cannot change the carrier or service directly on the waybill itself; they are inherited from the document.
- Custom Shipping Agent — The user can freely select any Shipping Agent and Shipping Agent Service on the waybill, independent of what is set on the source document.
By default, new waybills use Default (Same as Document), which means the carrier follows the document’s setup automatically.
Use Custom Shipping Agent when you need to ship a specific order with a different carrier than the one set on the source document — for example, when an urgent order requires express delivery with a different carrier than the one normally assigned to that customer or order type.
Shipment Posting Type
Section titled “Shipment Posting Type”The Shipment Posting Type field is found on the Shipping Agent Services list page and controls how the shipment booking is submitted to the carrier. It is a per-service setting, so you can configure different posting types for different services.
The field has two options:
- Default — the standard posting behaviour. The carrier label is booked as a regular shipment. This is the correct choice for the vast majority of services.
- Order Shipment — posts the shipment as an order-type booking. Some carriers distinguish between order-based bookings and standard label-based bookings, and require the order type for certain services or workflows.
When to use Order Shipment: only when your carrier specifically requires order-based bookings rather than standard label bookings. This is carrier-specific behaviour — if you are unsure which type to use, check your carrier’s documentation or contact the carrier directly.
Loading Meter Factor
Section titled “Loading Meter Factor”Loading metres (LDM) are a unit used by many carriers — particularly in Scandinavian road freight and pallet shipping — to calculate freight charges based on the floor space a shipment occupies in a vehicle, rather than purely by weight or volume.
The Loading Meter Factor field on the Shipping Agent Services list page lets you configure automatic loading metre calculation for a service. When a value is entered here, the system automatically calculates the Loading Meter value on each Waybill Line using the following formula:
Loading Meter = Length × Width ÷ 10,000 ÷ Factor
The calculated value is then forwarded to the carrier as part of the shipment data and used for freight calculation.
Typical value: For a standard Euro pallet, the Loading Meter Factor is 2.4. Set this value on the Shipping Agent Service if your carrier charges based on loading metres for pallet shipments.
Addons, Additional services, Tracking mail & Notifications Setup
Section titled “Addons, Additional services, Tracking mail & Notifications Setup”Every Shipping Agent have various supplementary services associated to them. It is possible to assign optional services to a Shipping Agent Service.
The options available differ from Shipping Agent to Shipping Agent but also from Shipping Agent Service to Shipping Agent Service. However, SMS and E-mail notifications are universally available. It is possible to select multiple addons, services and notification types.
An example of an optional service is e-mail Notification where the receiver of the shipment will receive an e mail notification containing the status of their parcel.
Insurance and Cash on Delivery Amounts
Section titled “Insurance and Cash on Delivery Amounts”When Insurance or Cash on Delivery (COD) is activated as an additional service on a Shipping Agent Service, the system automatically calculates and populates the corresponding amount on the Waybill Lines when a new waybill is created. You do not need to enter these amounts manually.
- Insurance Amount — calculated from the order value excluding VAT, converted to your local currency. This value is forwarded to the carrier as the declared insurance value for the shipment.
- Cash on Delivery Amount — calculated from the order value including VAT, converted to your local currency. This value is forwarded to the carrier as the amount to collect from the recipient upon delivery.
Both amounts are auto-populated when the waybill is created. If the calculated amount is not correct for a specific shipment — for example, if you need to adjust the insured value — you can manually override the amount directly on the Waybill Line.
Where to find the fields: The Insurance Amount and Cash on Delivery Amount fields are on the Waybill Lines. They are hidden by default — see Hidden Fields on Waybill Header and Waybill Lines for instructions on how to make them visible.
Service Points (Pick-up Points)
Section titled “Service Points (Pick-up Points)”Service points are locations — such as parcel shops, pick-up lockers, and collection points — where customers can collect their parcels instead of having them delivered to a home or business address. When a carrier service supports service points, you can select a specific pick-up location on the waybill so the carrier routes the shipment there instead of to the recipient’s address.
Enabling Service Points
Section titled “Enabling Service Points”Service points are enabled per Shipping Agent Service. To activate this feature for a service:
- Open the Shipping Agent Services list page
- Find the relevant service and check the Use Servicepoints checkbox
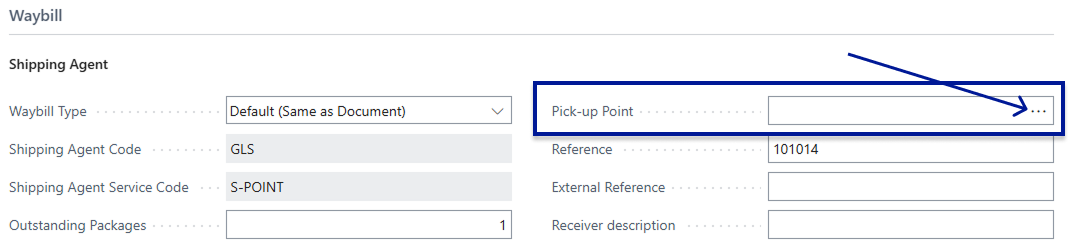
Once enabled, the Pick-up Point field and a lookup button will appear on the Waybill Header for any waybill using that service.
Selecting a Service Point on a Waybill
Section titled “Selecting a Service Point on a Waybill”When the Pick-up Point field is visible on the Waybill Header:
- Click the lookup button next to the Pick-up Point field
- A list of available service points near the Ship-to Post Code on the waybill is fetched from the carrier platform and displayed
- Browse the list and select the service point you want to use
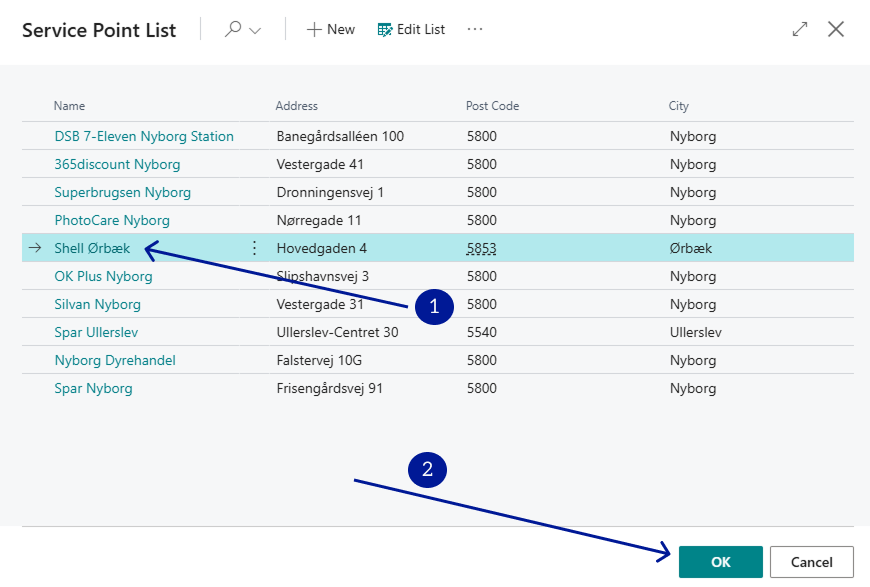
Once selected, the service point ID is stored on the waybill.

What happens when posting
Section titled “What happens when posting”When the waybill is posted, the selected service point ID is forwarded to the carrier. The carrier then routes the shipment to the chosen service point rather than delivering it to the recipient’s home or business address.
Package types Setup
Section titled “Package types Setup”Every Shipping Agent Service has one or more related Package Types. The package types can be copied to allow for different variations of say a Whole pallet - it also has a description which may be changed - additionally, it is possible to adjust the dimensions of the package in the given metric correlating with your setup in Shipment measurements
The description of the package, as well as the dimensions are automatically inserted onto the waybill lines when the package type is selected. It is also possible to define Pallet Exchange and select a package type as the default package type for the Shipping Agent Service - this in turn will insert the package type automatically when the Shipping Agent Service is selected.
In order to access the overview for a given Shipping Agent’s package types you have to navigate onto the given Shipping Agent and afterwards select a Shipping Agent service on the line and then access the following in the ribbon under Additional Services (click the downwards pointing arrow) Additional Services > Package Types.
Customs
Section titled “Customs”For Shipments outbound for non-EU countries you are required to accompany the shipment with the appropriate Customs data. This can easily be handled with our Customs handling system.
Setup for Customs
Section titled “Setup for Customs”Firstly you should ensure that your items have the correct and valid data such as Country of Origin & Tariff Codes both of which are standard Business Central fields on the item card.
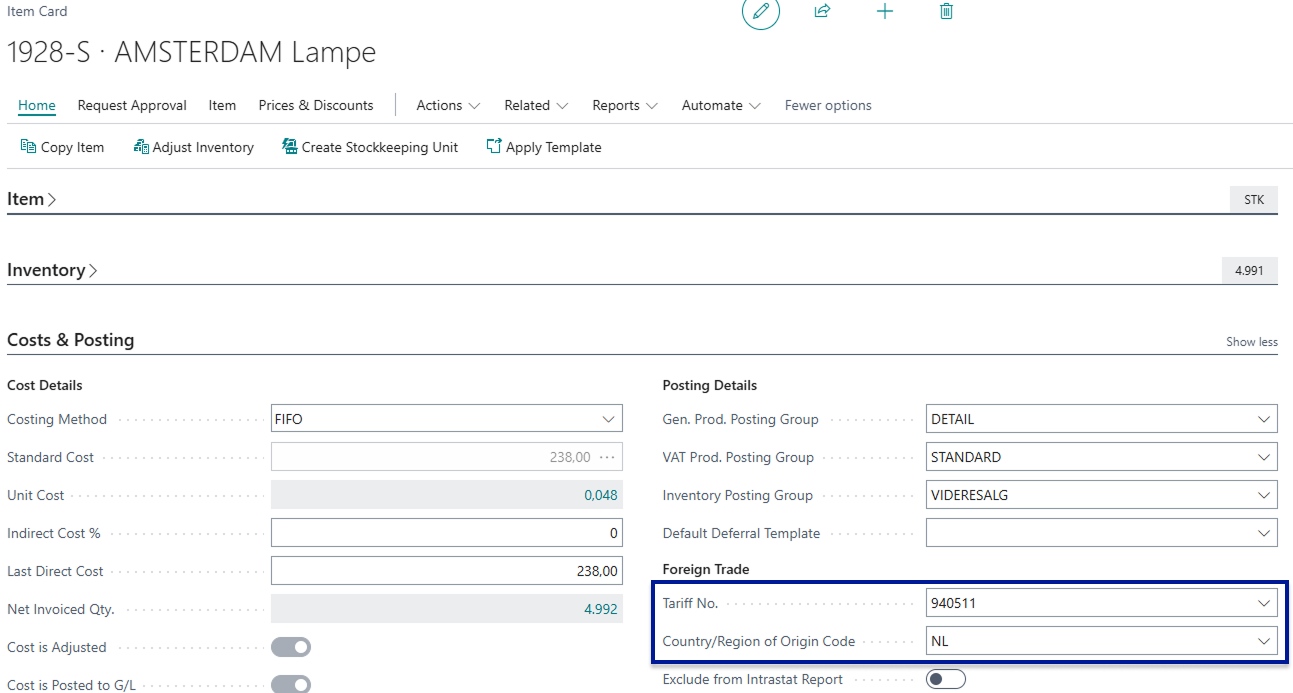
Besides Country of Origin & Tariff Codes from the item card the customs system will take the necessary information from the sales order lines, this includes Currency Code, Quantity, SKU (Item no.), unit weight, unit price (includes any discount on the lines)
Secondly, the shipping agent service will have a field called customs type where you have to select a type from the enum list. It depends on the carrier but usually this would be the unit value that you select, in rare instances it is the total value, ensure to contact the Multi-Carrier platform or the carriers themselves to ask what they prefer if in doubt.
Customs Type
Section titled “Customs Type”The Customs Type field on the Shipping Agent Service controls what value is declared to the carrier for each customs line. This setting is configured per Shipping Agent Service, so different services can use different customs types depending on what each carrier expects.
The field has three options:
- Default (Duty free) — No customs value is declared. The shipment is treated as duty-free and no monetary value is sent to the carrier. Use this for intra-EU shipments or any shipment where no customs declaration is required.
- Assign unit value — The unit price per item (excluding VAT, including any line discount) is sent to the carrier for each customs line. Use this when your carrier requires the per-unit value for customs declaration purposes.
- Assign total value — The total line value (excluding VAT, including any line discount) is sent to the carrier for each customs line. Use this when your carrier requires the total value per line rather than the individual unit price.
Export Reason
Section titled “Export Reason”The Export Reason field is found on Waybill Lines and is used to specify the reason for export on customs declarations for international shipments.
When shipping to non-EU countries, customs authorities require documentation that includes not only the value and description of the goods, but also the reason why the goods are being exported. The Export Reason field captures this information and forwards it to the carrier as part of the customs declaration.
Common export reason values include:
- Commercial sale — goods sold to a customer abroad
- Gift — goods sent as a gift with no commercial value
- Sample — goods sent as a product sample
- Return — goods being returned to the sender or supplier
When it is relevant: The Export Reason field applies to non-EU shipments where customs documentation is required. For intra-EU shipments, this field is not needed.
Where to find it: The Export Reason field is on the Waybill Lines. If it is not visible, it may be hidden — see Hidden Fields on Waybill Header and Waybill Lines for instructions on how to show hidden fields.
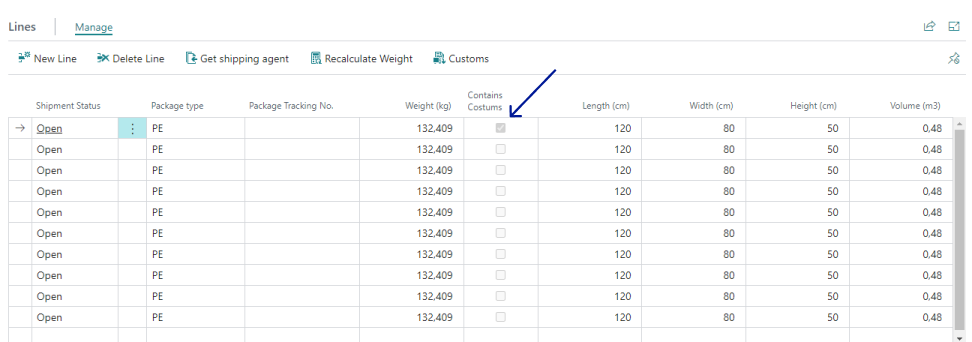
When you have completed your pick, filled out Waybill & Waybill lines then select the customs button in the ribbon above the Waybill lines

This will open a new page which holds your Customs data for the given order. To automatically create the customs information use the Create Customs lines button at the top of the page.
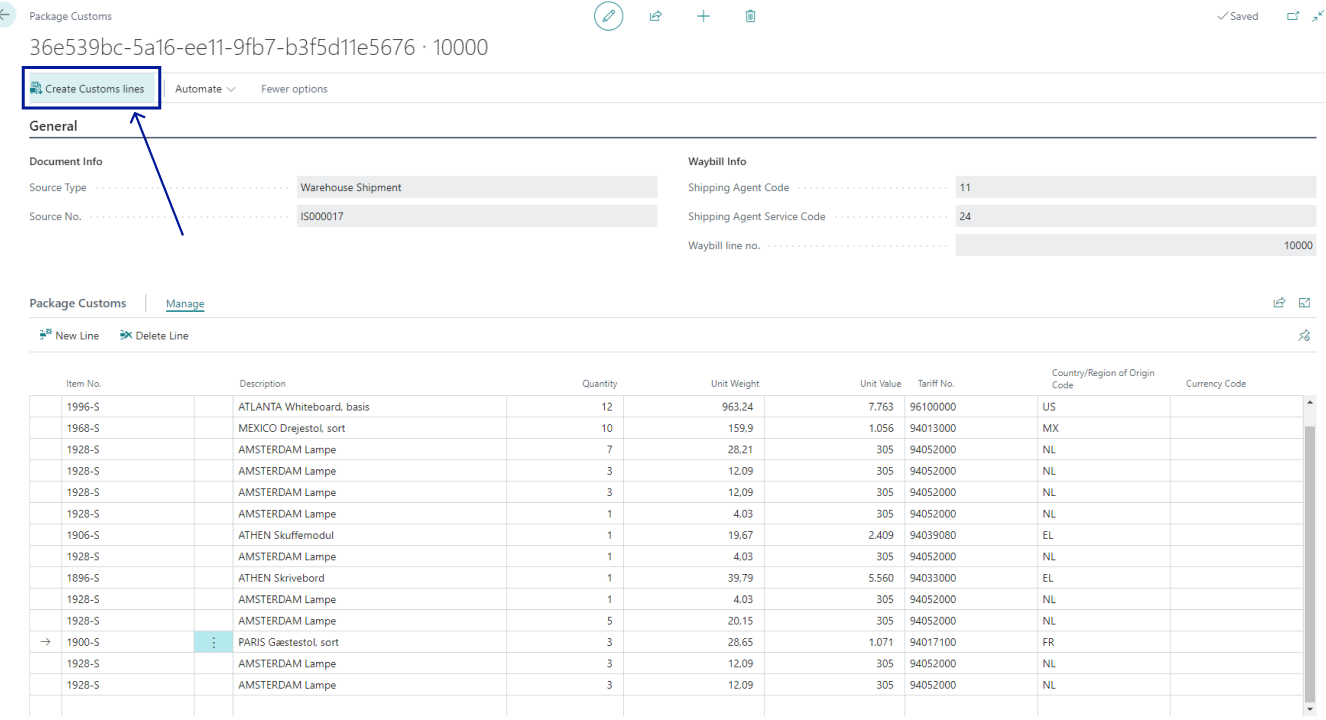
Once that is done you can check your data to see if anything is missing, however, if everything is in order you can simply exit this page and your shipment will now be accompanied by the proper customs information and based on this the Multi-Carrier platform will then automatically create a Proforma Invoice (also referred to as Paperless Invoicing) and sent to the carrier - Removing the now redundant necessity to manually create an invoice and sent to the carrier.
Track & trace
Section titled “Track & trace”On the Track & Trace page in Business Central you can find all relevant information about your outgoing Shipments, including tracking numbers, order numbers, Receiver information and so forth. You can also use the track package function to directly transfer you to the carriers tracking page with the given tracking number of the selected line - enabling instantaneous access to the status of the shipment. You can also reprint shipping labels that are either missing or have become invalid.
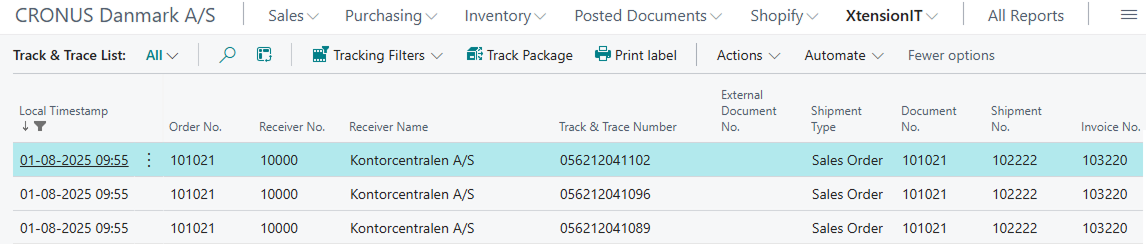
If you enable fact boxes on this page you will see a more detailed account of the given shipment selected.
Setting up the tracking url for the Track package function
Section titled “Setting up the tracking url for the Track package function”On the Shipping Agent page you can add a tracking url to the shipping agent. This tracking url varies depending on the individual tracking pages and urls the carriers use. Therefore it is necessary to search for this for the given carrier being utilised. To give an example let us try and set up the tracking url for GLS. Start by opening your preferred browser and search for something along the lines of GLS tracking. When you have found their tracking page, try typing something into their search field such as “123” this is simply to trigger an update of the pages url. If it does update the url to something that ends with “?match=123” it has been done correct, if not you can also just add “?match=123” at the end of the url and it should update the page as well. You can then replace the fictive tracking number “123” with %1 and you now have the tracking url used for GLS packages.
![]()
GLS tracking link: https://gls-group.com/DK/en/parcel-tracking?match=%1
Additional commonly known tracking urls
Section titled “Additional commonly known tracking urls”- Danske Fragtmænd: https://trace.fragt.dk/#/trackTrace/%1
- PostNord: https://www.postnord.dk/en/tools/track-and-trace?shipmentId=%1
- UPS: https://www.ups.com/track?loc=en_DK&requester=QUIC&tracknum=%1/
- FedEx: https://www.fedex.com/fedextrack/no-results-found?trknbr=%1
- TNT: https://www.tnt.com/express/da_dk/site/shipping-tools/tracking.html?searchType=con&cons=%1
- Freja: https://www.freja.com/tracking/?%1
- Blue Water Shipping: https://www.tracking-status.com/blue-water-shipping-tracking-page/?tn=%1
- DB Schenker: https://www.dbschenker.com/app/tracking-public/?refNumber=%1&language_region=en-US_US
- Schou Danielsen logistik: https://t.alicetms.dk/#/SDL/TrackAndTrace/%1
Use Shipping Agent Reference/Waybill no for tracking
Section titled “Use Shipping Agent Reference/Waybill no for tracking”Some Shipping Agents such as Danske Fragtmænd do not use the individual tracking no’s to track packages they use a Waybill no. or something akin to it to track shipments. Therefore we have a functionality on the shipping agent that can be activated that uses the Waybill no. instead - this does require that it is returned to us from the Shipping agent/Multi-carrier platform.

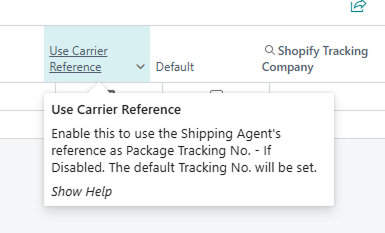
If in doubt you should ask your Shipping Agent or the multi-carrier platform whether that specific shipping agent uses a Waybill no. to track or the individual tracking no. to track with.
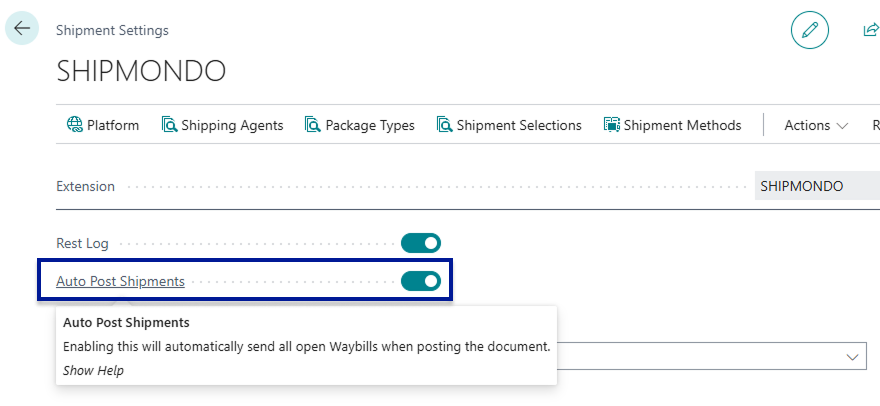
Auto-Post Shipments (When Posting Document in BC)
Section titled “Auto-Post Shipments (When Posting Document in BC)”On the setup page Shipment Settings you can enable a function called Auto-Post Shipments. This feature will automatically sent all open Waybill lines when posting a document. This enables users to use Business Centrals standard posting algorithm - This can save an additional click and allow for Business Central to handle the printing of the parcel slip (Posted Sales Shipment) and the freight label at the same time.
Shipment Selections
Section titled “Shipment Selections”Shipment Selections allow you to control which functions are triggered when a waybill is posted for a specific Shipping Agent / Shipping Agent Service combination. By configuring Shipment Selections, you can tailor the posting behaviour per carrier service — for example, automatically generating a return label alongside the outbound label, or enabling cancellation for a specific service.
Where to find Shipment Selections
Section titled “Where to find Shipment Selections”Shipment Selections are accessible from two places:
- The Shipping Agents list page — select a Shipping Agent and open Shipment Selections from the ribbon
- The Shipping Agent Services list page — select a Shipping Agent Service and open Shipment Selections from the ribbon
Available functions
Section titled “Available functions”Each entry in Shipment Selections links a Shipping Agent Service to one or more Shipment Functions. The following functions are available:
- Post Shipment — books the shipment with the carrier and generates a carrier label (standard posting)
- Get Quote — retrieves a freight price estimate from the carrier before committing to a shipment
- Post Order — posts the shipment as an order-type booking (carrier-specific behaviour)
- Post Draft — posts the shipment as a draft booking (carrier-specific behaviour)
- Post Return — generates a return shipment label at the same time as the outbound label
- Cancel Shipment — sends a cancellation request to the carrier for a previously booked shipment
- Reprint Label — reprints an existing carrier label for a posted shipment
- Print Related Documents — prints carrier-related documents associated with the shipment
Combining multiple functions
Section titled “Combining multiple functions”Multiple functions can be configured for the same Shipping Agent Service. For example, you can add both Post Shipment and Post Return to a service so that every time a waybill is posted for that service, both an outbound label and a return label are generated automatically — without any extra steps for the user.
Reprint Label
Section titled “Reprint Label”The Reprint Label function allows you to reprint an existing carrier label for a previously posted shipment. This is useful when a label has been lost, damaged, or needs to be reprinted for any other reason — without having to re-book the shipment with the carrier.
To enable Reprint Label for a Shipping Agent Service:
- Open the Shipping Agents or Shipping Agent Services list page
- Select the relevant Shipping Agent Service and open Shipment Selections from the ribbon
- Add the Reprint Label function to the Shipment Selections for that service
Once configured, the Reprint Label action becomes available for posted waybills using that service.
A related function, Print Related Documents, can also be added to Shipment Selections. This prints carrier-related documents associated with the shipment — such as delivery notes or customs documents — and works in the same way as Reprint Label.
Return Shipments
Section titled “Return Shipments”Return shipments allow you to include a pre-paid return label with the outbound delivery, so the customer has everything they need to send goods back if required. This is configured through Shipment Selections and requires no extra manual steps once set up.
When to use Return Shipments
Section titled “When to use Return Shipments”Use Return Shipments when you want to include a return label in the same shipment as the outbound delivery — for example, when your business process requires customers to have a pre-paid return option, or when the carrier service you use supports automatic return label generation.
How to set up Return Shipments
Section titled “How to set up Return Shipments”To enable return labels for a Shipping Agent Service:
- Open the Shipping Agents or Shipping Agent Services list page
- Select the relevant Shipping Agent Service and open Shipment Selections from the ribbon
- Add the Post Return function to the Shipment Selections for that service
Once configured, every waybill posted for that service will automatically trigger return label generation alongside the outbound label.
What happens when posting
Section titled “What happens when posting”When a waybill is posted for a service that has Post Return configured in Shipment Selections:
- The system books the outbound shipment and generates the outbound carrier label as normal
- A return label is also generated automatically and sent to the carrier platform
- The return label can be printed and included with the shipment for the customer
- The Return Quantity field on the Waybill Lines controls how many return packages are included
Cancel Shipment
Section titled “Cancel Shipment”The Cancel Shipment function lets you send a cancellation request to the carrier for a shipment that has already been booked. This is useful when an order is cancelled after the waybill has been posted, allowing you to cancel the carrier booking directly from Business Central without having to log in to the carrier platform manually.
How to enable Cancel Shipment
Section titled “How to enable Cancel Shipment”Cancel Shipment must be configured in Shipment Selections before it can be used. To enable it for a Shipping Agent Service:
- Open the Shipping Agents or Shipping Agent Services list page
- Select the relevant Shipping Agent Service and open Shipment Selections from the ribbon
- Add the Cancel Shipment function to the Shipment Selections for that service
Once configured, the Cancel Shipment action becomes available for waybills posted using that service.
How to use Cancel Shipment
Section titled “How to use Cancel Shipment”After Cancel Shipment has been enabled for a service, you can cancel a booked shipment from:
- The source document (Sales Order, Transfer Order, etc.) — use the Cancel Shipment action in the Shipment ribbon
- The Track & Trace page — select the shipment and use the Cancel Shipment action
When triggered, the system sends a cancellation request to the carrier platform. The carrier then cancels the booking on their end.

Confirmation Types
Section titled “Confirmation Types”You can select between three Confirmation types:
- Direct Print
- Confirm Shipment
- Confirm Package
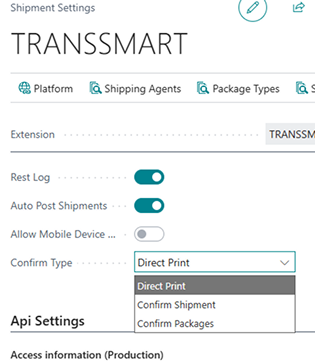
Direct Print
Section titled “Direct Print”When this is select shipments will be sent directly, without confirmation - utilise this if you are sure of your process and do not want the added step of confirming data for your shipments.
Confirm Shipment
Section titled “Confirm Shipment”Before the Shipment and its packages are posted and sent to the Carrier via the Multi-Carrier platform users will be prompted to confirm the data of the entire shipment, users have the possiblity of changing the printer if they desire.
Confirm Packages
Section titled “Confirm Packages”Before the Shipment and its packages are posted and sent to the Carrier via the Multi-Carrier platform users will be prompted to confirm the data of each package of the shipment. Here it is possible to make additions to the Waybill lines, you can add or delete waybill lines or change existing waybill lines such as their weight & dimensions or package type, as well as the printer used for labels.

Shipment Quote Setup
Section titled “Shipment Quote Setup”At the bottom of the Shipment Settings page there is a setup for the Shipping price.

In the setup it is possible to change the shipping price of a specific item, G/L account et cetera. You can adjust four parameters:
- Type: Refers to the type which is affected by the setup e.g. Item or G/L account.
- Number: Refers to e.g. the item or type of G/L account affected by the setup.
- Factor: Refers to how much is added or subtracted of the shipping price for the given type and number.
- Rounding Method: In this field it possible to define Rounding Methods.
IMPORTANT: Ensure to contact the given Multi-Carrier platform you are working with and ensure that the carriers support this setup.
Request Quote
Section titled “Request Quote”The Request Quote function lets you retrieve an estimated shipping price and delivery time from the carrier before committing to a shipment. This is useful when you need to check freight costs upfront, communicate shipping costs to a customer, or compare rates before deciding how to ship an order.
Request Quote is available on the following document types:
- Sales Orders
- Transfer Orders
- Service Orders
Accessing Request Quote
Section titled “Accessing Request Quote”Open the relevant document and select Request Quote from the Shipment ribbon or actions area. You can also use the keyboard shortcut Alt+R.
What happens after requesting a quote
Section titled “What happens after requesting a quote”Once you trigger Request Quote, the connector sends the shipment details to the carrier platform. The carrier returns an estimated quote which is then displayed directly in Business Central, showing:
- Estimated shipping cost — the freight price for the shipment based on the current order details
- Estimated delivery time — the expected delivery timeframe for the selected carrier and service
You can review this information before deciding whether to proceed with posting the shipment.
When to use Request Quote
Section titled “When to use Request Quote”- Before committing to a shipment — check the freight cost before posting the waybill, so there are no surprises
- Communicating costs to customers — retrieve the estimated shipping price to include in a quote or order confirmation for the customer
- Comparing rates — request quotes for different carriers or services to find the most cost-effective option for a given order
Dangerous Goods
Section titled “Dangerous Goods”You can also use Dangerous Goods with all of the Shipment Connector (excluding Webshipper) More information about Dangerous goods can be found at Get started with Dangerous Goods