Shipment Connector shared functionality
Shipment Settings
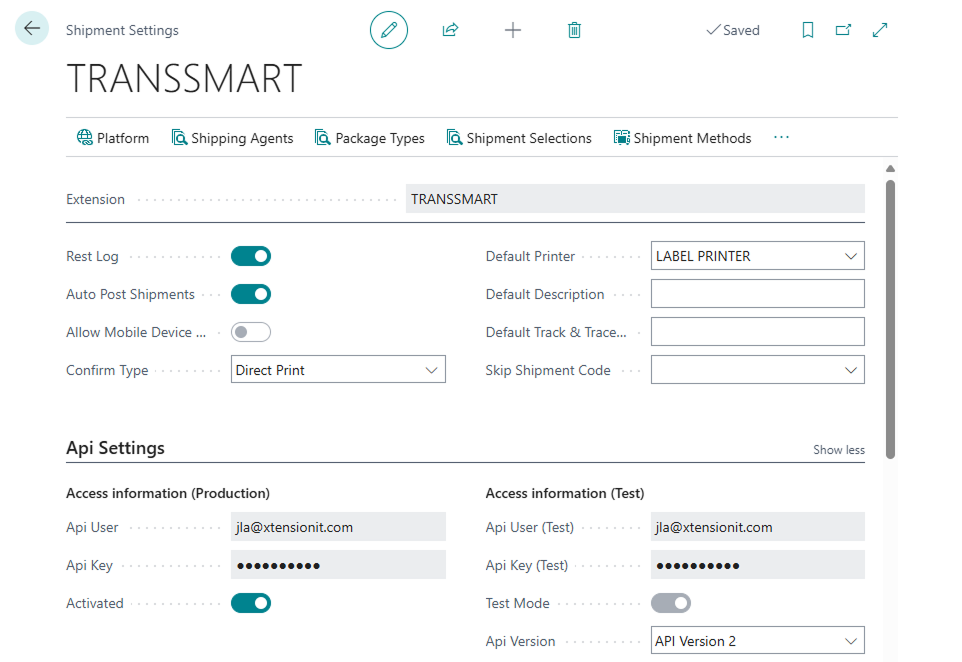
Section titled “Shipment Settings”Shipment Settings is the page of which all of our settings, options and additional information is kept. This is also where you connect with the given Multi-Carrier Platform. From here you can setup your Sender Address information, Shipment Measurements, confirmation types and more.
To see how you connect to the individual Shipment Connectors please see their individual pages here:
Shipment Sender information
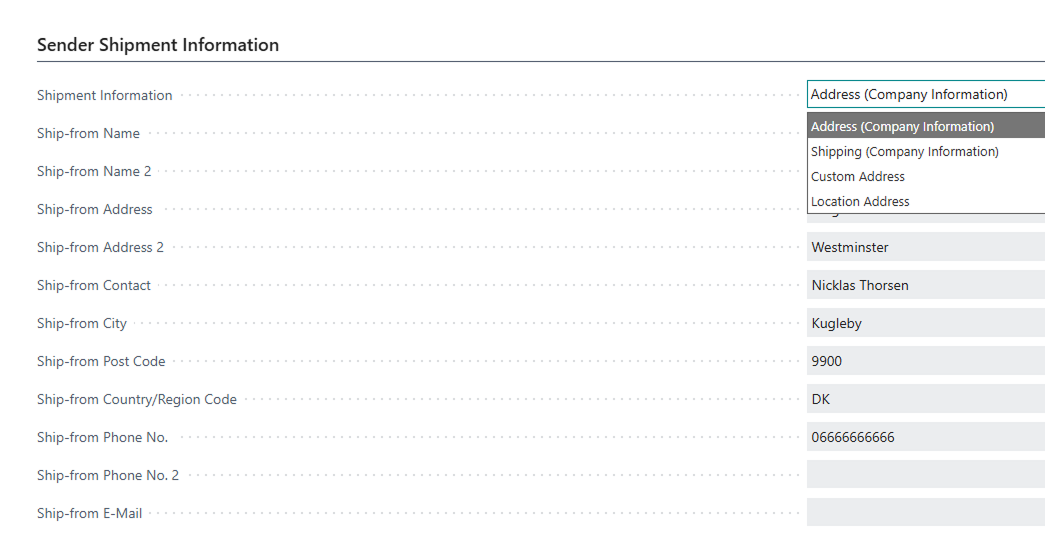
Section titled “Shipment Sender information”On the Shipment Settings Page you can set what your Ship-from address information should be. You have the choice of using the default address fields from Company information, the Shipping fields, create a completely custom address to be used or use your locations addresses which allows you to ship from multiple warehouses in the same environment.
Waybills & Shipments
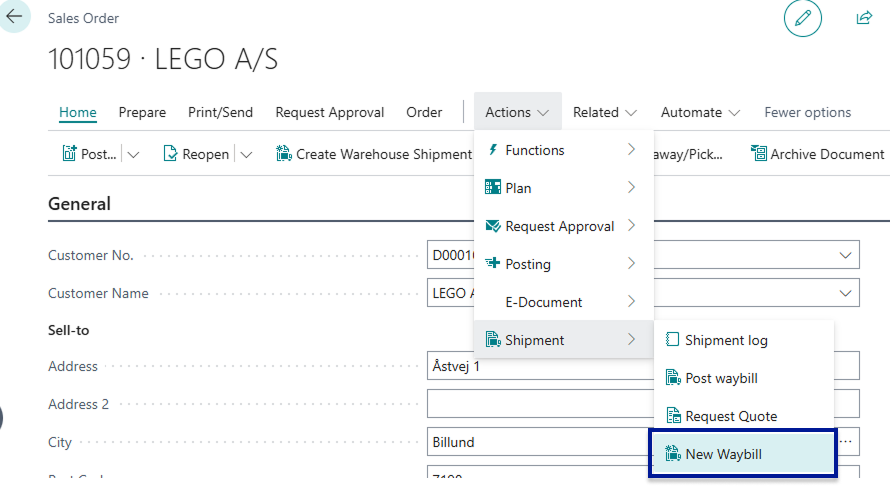
Section titled “Waybills & Shipments”Each of the Shipment Connectors utilises a Waybill to store the information that is forwarded to the Shipping Agent/Carrier. The relationship between Waybills and orders are 1 to 1. For each order one waybill is created. The only exception is for documents that existed prior to the installation of the Shipment Connector - For these pre-existing documents users will have to manually create a Waybill which can be done by opening the given document and navigating to the following Actions > Shipment > New Waybill.
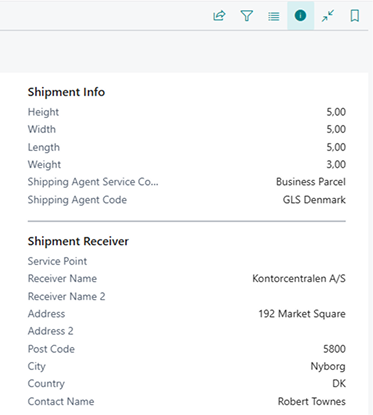
It is also on the Waybill that the parcel information which is forwarded to the shipping agent is entered. The Waybill consists of a Shipping Agent/Carrier, an associated Shipping Agent Service, order reference no. and optionally a pick-up point ID, and receiver description.
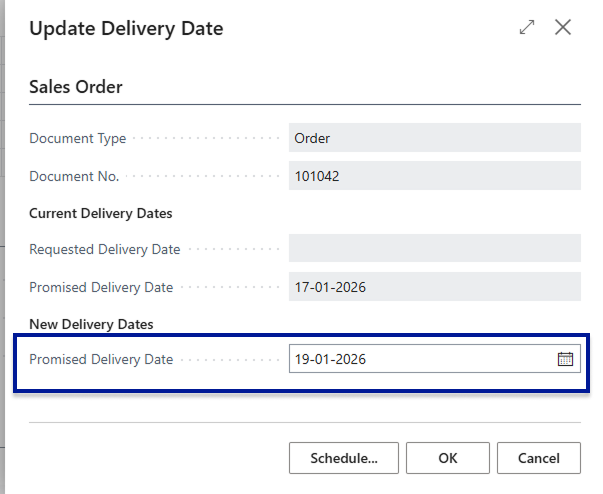
We also have two sections for Pick-up information and Ship-to information where you can enter when you want you shipments to be picked up and at which time as well, along with when the desired delivery time and date of the shipment. If you are Shipping from Sales Orders then you can use the standard Business Central fields Requested and promised Delivery (Primised Delivery Date > Requested Delivery Date) date to assign a delivery date for the shipment.
For warehouse shipments we have added a field called delivery date under the Shipment section where you can change the delivery date.

By default we aim to utilise as much as Standard Business Central as possible so if you have setup a standard shipping agent and shipping agent service on your Customers In Business Central these fields are filled out in the Waybill Header automatically - it is essential that a shipping agent and a shipping agent service is specified and set up properly on the waybill that is being handled otherwise it is not possible to forward the relevant information to the Multi-carrier platform and thereby the carrier itself.

Posting The Waybill
Section titled “Posting The Waybill”The most essential function to the Shipment Connectors is tranferring Shipment Data to the multi-carrier Platform and through to the given carrier thereby booking the shipment and printing the necessary labels. While there is not inherently intended a specific process for when to use the Waybill as it is flexible and can be used both pre-posting and after posting of documents, and is therefore likely to cover the majority of different business’ and their various process along with that - We do envision the Waybill as the finalising part of the picking process once picking is completed for an order.
Once the pick has been completed you can
Customs
Section titled “Customs”For Shipments outbound for non-EU countries you are required to accompany the shipment with the appropriate Customs data. This can easily be handled with our Customs handling system.
Setup for Customs
Section titled “Setup for Customs”Firstly you should ensure that your items have the correct and valid data such as Country of Origin & Tariff Codes both of which are standard Business Central fields on the item card.
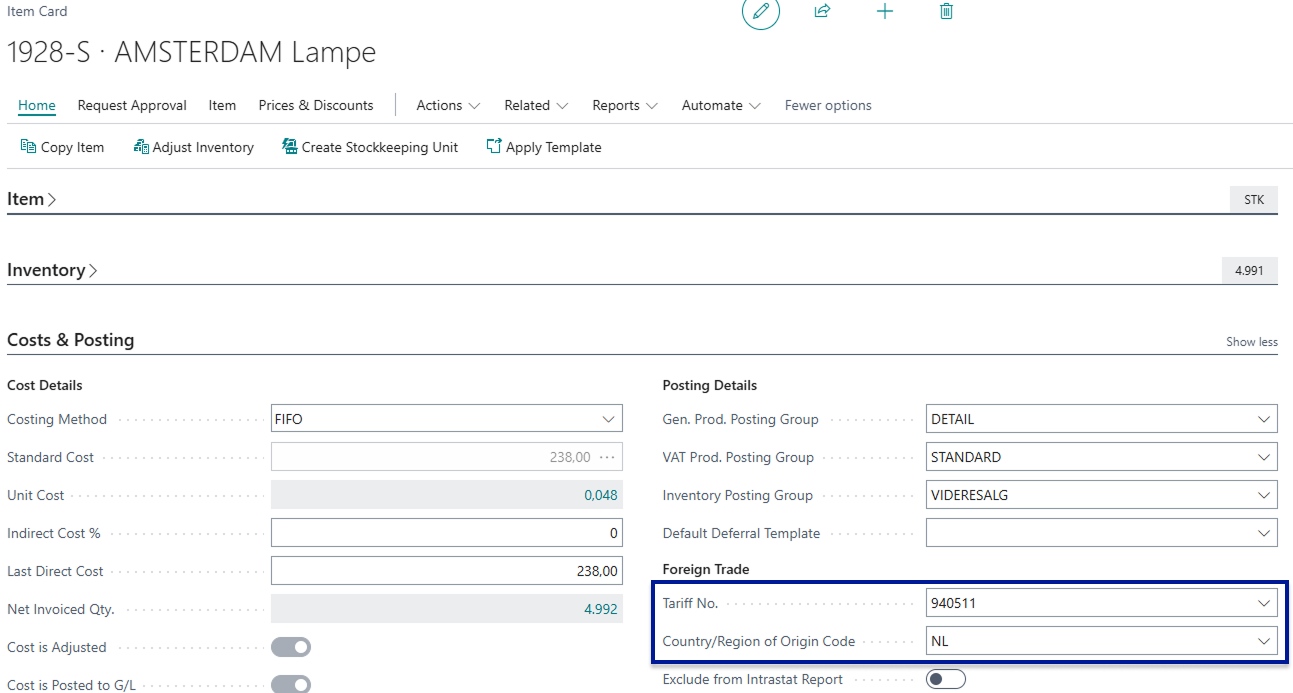
Besides Country of Origin & Tariff Codes from the item card the customs system will take the necessary information from the sales order lines, this includes Currency Code, Quantity, SKU (Item no.), unit weight, unit price (includes any discount on the lines)
Secondly, the shipping agent service will
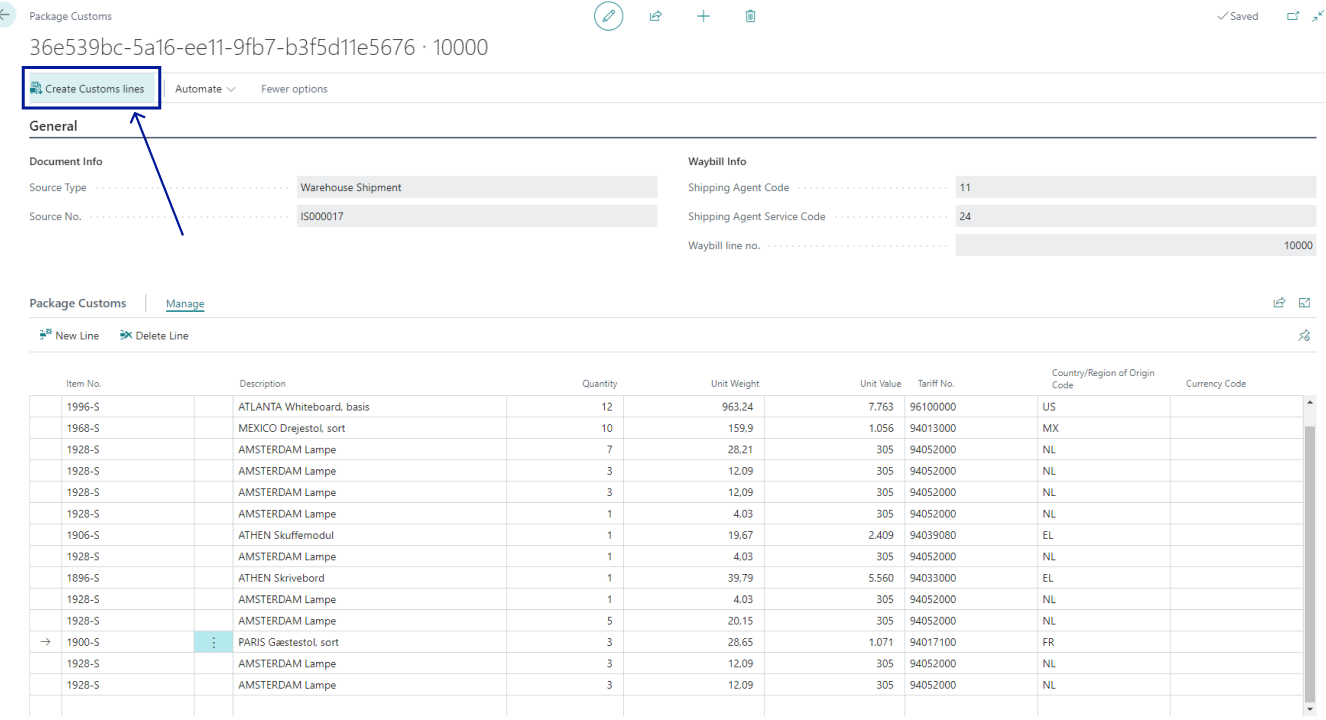
When you have completed your pick, filled out Waybill & Waybill lines then select the customs button in the ribbon above the Waybill lines

This will open a new page which holds your Customs data for the given order. To automatically create the customs information use the Create Customs lines button at the top of the page.
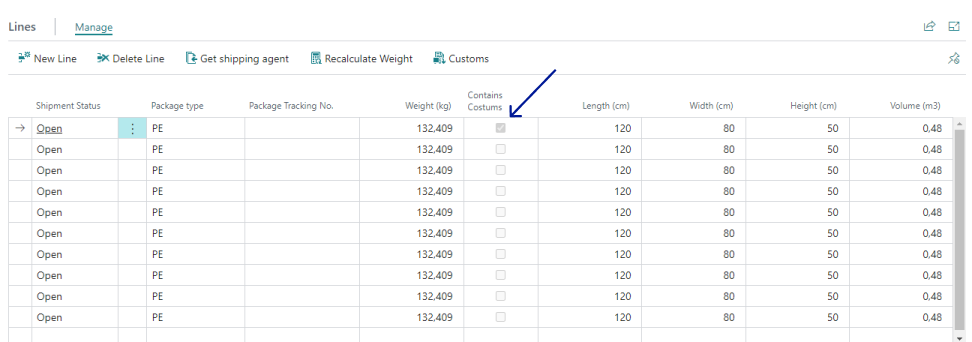
Once that is done you can check your data to see if anything is missing, however, if everything is in order you can simply exit this page and your shipment will now be accompanied by the proper customs information and based on this the Multi-Carrier platform will then automatically create a Proforma Invoice (also referred to as Paperless Invoicing) and sent to the carrier - Removing the now redundant necessity to manually create an invoice and sent to the carrier.
Track & trace
Section titled “Track & trace”On the Track & Trace page in Business Central you can find all relevant information about your outgoing Shipments, including tracking numbers, order numbers, Receiver information and so forth. You can also use the track package function to directly transfer you to the carriers tracking page with the given tracking number of the selected line - enabling instantaneous access to the status of the shipment. You can also reprint shipping labels that are either missing or have become invalid.
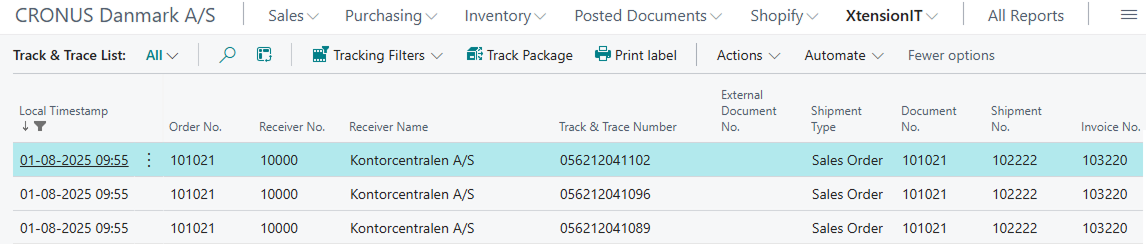
If you enable fact boxes on this page you will see a more detailed account of the given shipment selected.
Setting up the tracking url for the Track package function
Section titled “Setting up the tracking url for the Track package function”On the Shipping Agent page you can add a tracking url to the shipping agent. This tracking url varies depending on the individual tracking pages and urls the carriers use. Therefore it is necessary to search for this for the given carrier being utilised. To give an example let us try and set up the tracking url for GLS. Start by opening your preferred browser and search for something along the lines of GLS tracking. When you have found their tracking page, try typing something into their search field such as “123” this is simply to trigger an update of the pages url. If it does update the url to something that ends with “?match=123” it has been done correct, if not you can also just add “?match=123” at the end of the url and it should update the page as well. You can then replace the fictive tracking number “123” with %1 and you now have the tracking url used for GLS packages.
![]()
GLS tracking link: https://gls-group.com/DK/en/parcel-tracking?match=%1
Additional commonly known tracking urls
Section titled “Additional commonly known tracking urls”- Danske Fragtmænd: https://trace.fragt.dk/#/trackTrace/%1
- PostNord: https://www.postnord.dk/en/tools/track-and-trace?shipmentId=%1
- UPS: https://www.ups.com/track?loc=en_DK&requester=QUIC&tracknum=%1/
- FedEx: https://www.fedex.com/fedextrack/no-results-found?trknbr=%1
- TNT: https://www.tnt.com/express/da_dk/site/shipping-tools/tracking.html?searchType=con&cons=%1
- Freja: https://www.freja.com/tracking/?%1
- Blue Water Shipping: https://www.tracking-status.com/blue-water-shipping-tracking-page/?tn=%1
- DB Schenker: https://www.dbschenker.com/app/tracking-public/?refNumber=%1&language_region=en-US_US
- Schou Danielsen logistik: https://t.alicetms.dk/#/SDL/TrackAndTrace/%1
Use Shipping Agent Reference/Waybill no for tracking
Section titled “Use Shipping Agent Reference/Waybill no for tracking”Some Shipping Agents such as Danske Fragtmænd do not use the individual tracking no’s to track packages they use a Waybill no. or something akin to it to track shipments. Therefore we have a functionality on the shipping agent that can be activated that uses the Waybill no. instead - this does require that it is returned to us from the Shipping agent/Multi-carrier platform.

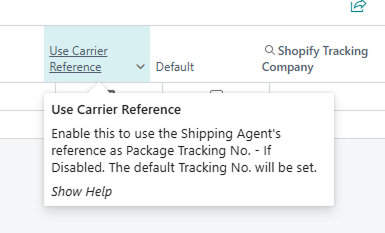
If in doubt you should ask your Shipping Agent or the multi-carrier platform whether that specific shipping agent uses a Waybill no. to track or the individual tracking no. to track with.
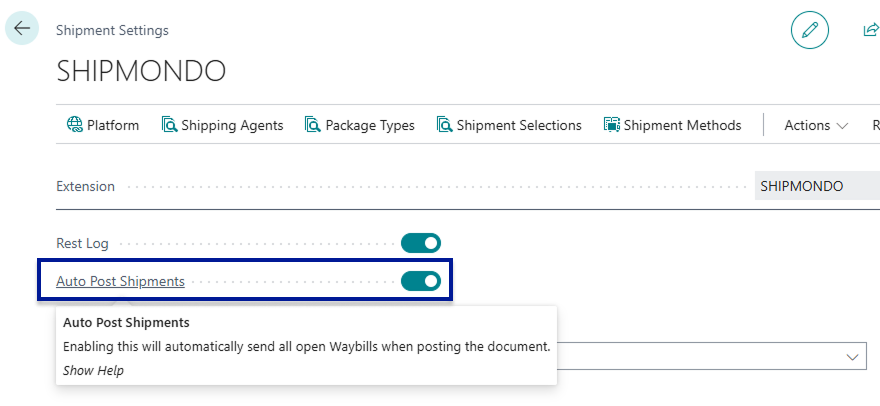
Auto-Post Shipments (When Posting Document in BC)
Section titled “Auto-Post Shipments (When Posting Document in BC)”On the setup page Shipment Settings you can enable a function called Auto-Post Shipments. This feature will automatically sent all open Waybill lines when posting a document. This enables users to use Business Centrals standard posting algorithm - This can save an additional click and allow for Business Central to handle the printing of the parcel slip (Posted Sales Shipment) and the freight label at the same time.
Confirmation Types
Section titled “Confirmation Types”You can select between three Confirmation types:
- Direct Print
- Confirm Shipment
- Confirm Package
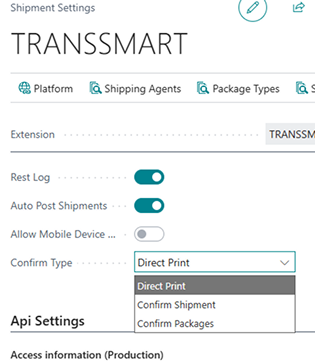
Direct Print
Section titled “Direct Print”When this is select shipments will be sent directly, without confirmation - utilise this if you are sure of your process and do not want the added step of confirming data for your shipments.
Confirm Shipment
Section titled “Confirm Shipment”Before the Shipment and its packages are posted and sent to the Carrier via the Multi-Carrier platform users will be prompted to confirm the data of the entire shipment, users have the possiblity of changing the printer if they desire.
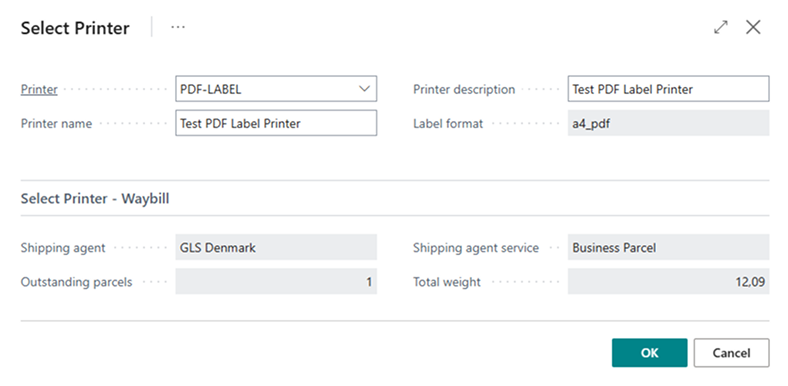
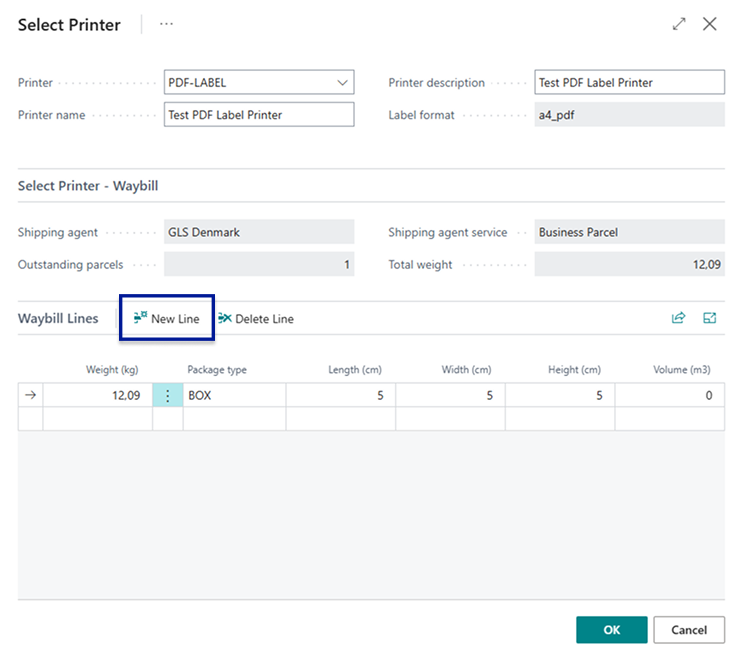
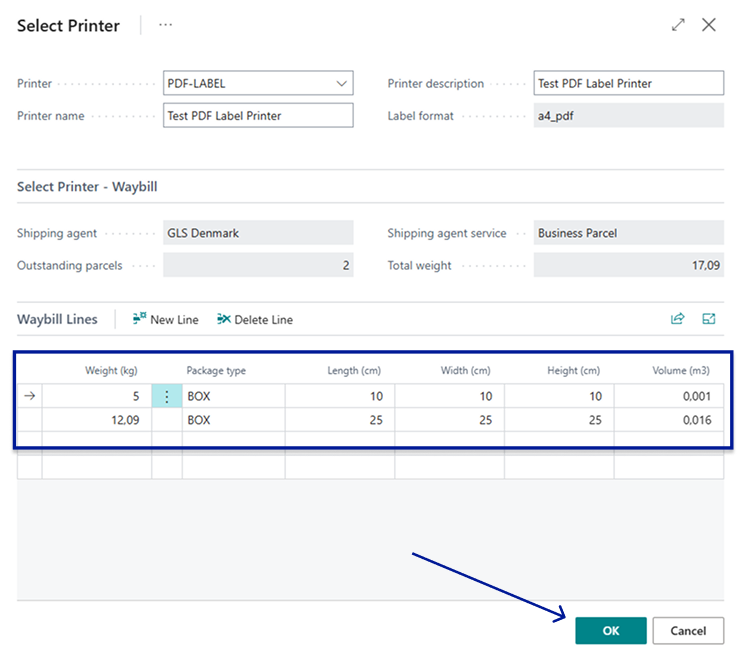
Confirm Packages
Section titled “Confirm Packages”Before the Shipment and its packages are posted and sent to the Carrier via the Multi-Carrier platform users will be prompted to confirm the data of each package of the shipment. Here it is possible to make additions to the Waybill lines, you can add or delete waybill lines or change existing waybill lines such as their weight & dimensions or package type, as well as the printer used for labels.

Dangerous Goods
Section titled “Dangerous Goods”You can also use Dangerous Goods with all of the Shipment Connector (excluding Webshipper) More information about Dangerous goods can be found at Get started with Dangerous Goods