Dangerous Goods User Guide
Preface
Section titled “Preface”Welcome to the Dangerous Goods user guide - this guide will go into detail how to setup and use the Dangerous Goods app, as well as its co-app The Dangerous Goods Extender app for the Shipment Connector.
This guide will compose of two parts. The first part will center around the Dangerous Goods app that contains the tables for Dangerous Goods Data for the item cards - The second part will then elaborate upon how this data is used with the Shipment Connectors and how that process works in Business Central.
The Dangerous Goods application
Section titled “The Dangerous Goods application”The Dangerous goods app extends the Item Card and introduces several new tables which allows you to create UN-numbers and attribute them to an Item. It aids in keeping record of all your Dangerous Goods data.
The setup of the Dangerous Goods application can be found in the header of your Business Central under the XtensionIT pane From here you can easily navigate to the three core components of the Dangerous Goods app namely the ADR Class List, UN number List & Transport Categories.

Dangerous Goods, UN numbers & ADR documents for carriers
Section titled “Dangerous Goods, UN numbers & ADR documents for carriers”With our Dangerous Goods system you can easily handle all of your Dangerous Goods Data for your items in Business Central. It works very well in conjunction with our Shipment Connector which allows you to not only to handle the data but also process it with your Shipments which ensures that the Dangerous Goods information is transferred to the carrier and the correct ADR documentation is provided via. the multi-carrier platform
Dangerous Goods Setup overview
Section titled “Dangerous Goods Setup overview”Like with any good system the data foundation is essential to have done correct and properly. And setting up the Dangerous Goods data requires a few steps. This section will take you through each of the necessary steps.
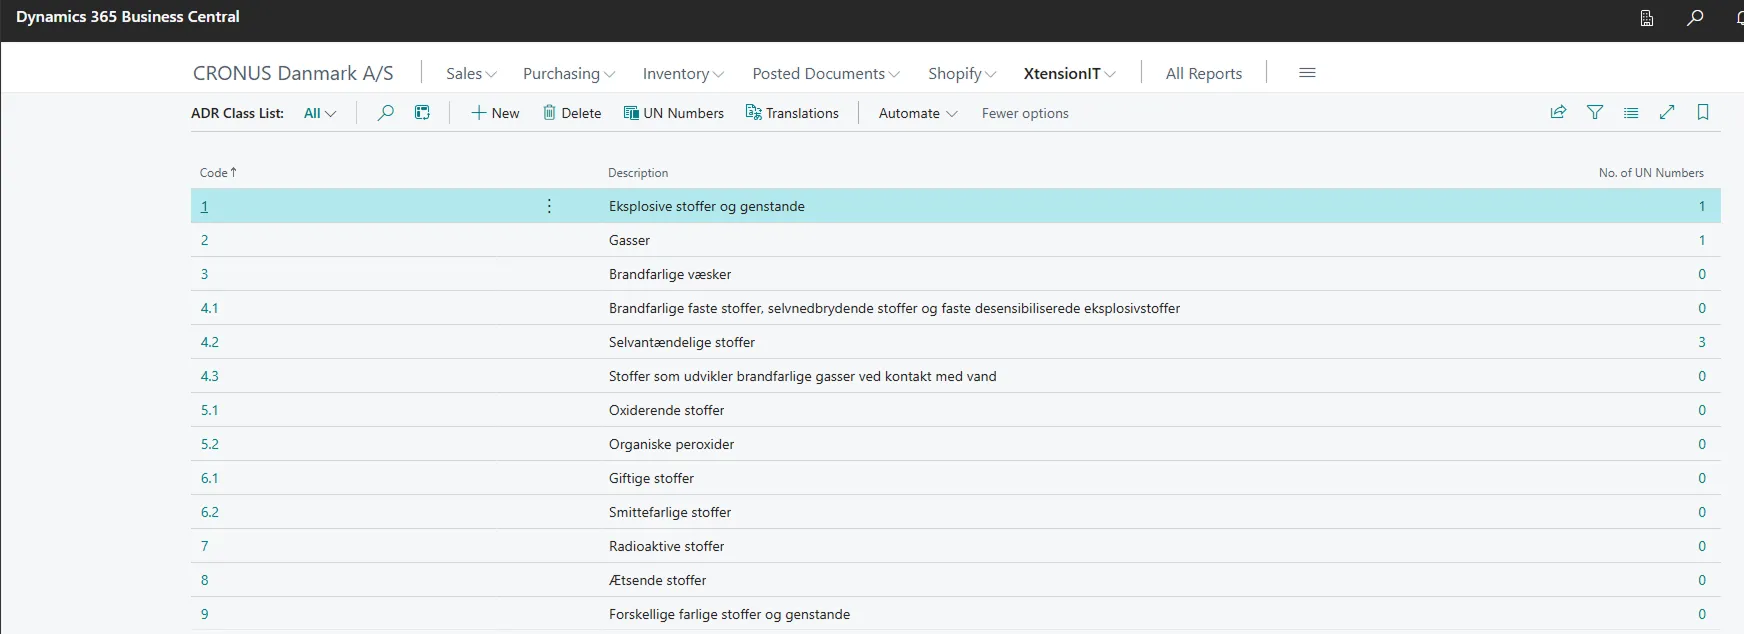
ADR classes
Section titled “ADR classes”Firstly you should look to setup your ADR Classes - this can be done several ways.
- You can set them up manually by simply editing the list and adding a record of the ADR class - you can find an overview of ADR classes from here. It is not neccesary to add all of the ADR classes you only have to add the ones you deem necessary and that you use.
- You can also just download this configuration package we have that contains all of the ADR classes from the aforementioned website. that you can find here.
An example of the ADR class list can be found below.
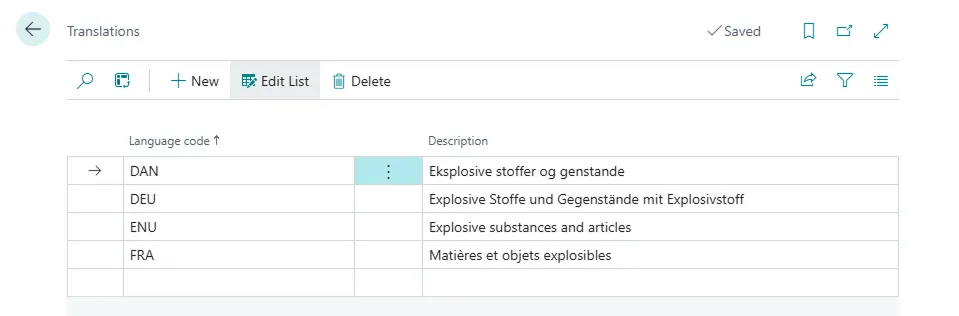
Translations
Section titled “Translations”If need be you can also Set up your translations if you need to send to multiple countries with various language codes.
1.1.3.6. Small Load exemption (Frimængde)
Section titled “1.1.3.6. Small Load exemption (Frimængde)”The 1.1.3.6. Small Load exemption (Frimængde beregning) is calculated automatically and informs the driver and carrier of whether they are exempt in following ‘Full’ ADR requirements.
For more information on this see the links below:
- Beredskabsstyrelsen information om 1.1.3.6 - Frimængde (Danish).
- Small load exemption 1.1.3.6 Dangerous Goods (English).
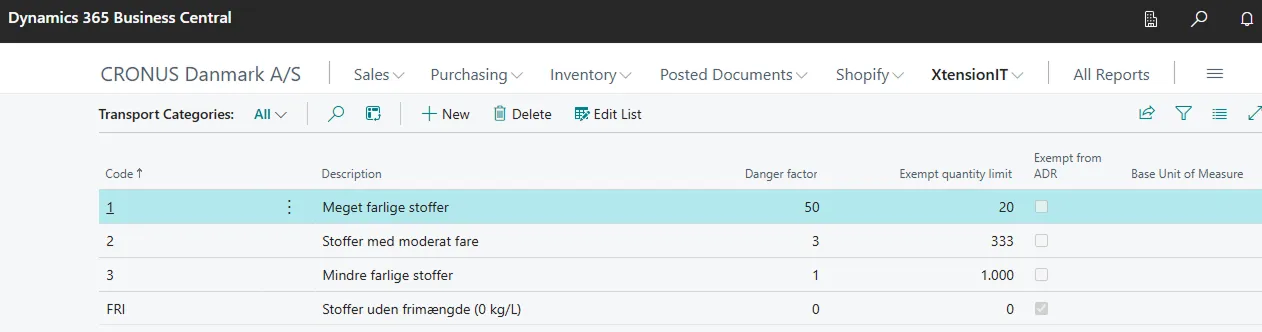
Transport Categories
Section titled “Transport Categories”In order for this to be calculated properly each UN-number is given a Transport category from 0 to 4. Each Category represents a danger factor and an exempt quantity limit. These can be set up manually, however, like before you can use the following link here to use one of our configuration packages which contains the four current categories along with their danger factor and exempt quantity limit - These are not necessarily definitive hence why it is important to keep up to date in regards to Dangerous Goods regulations and rules.
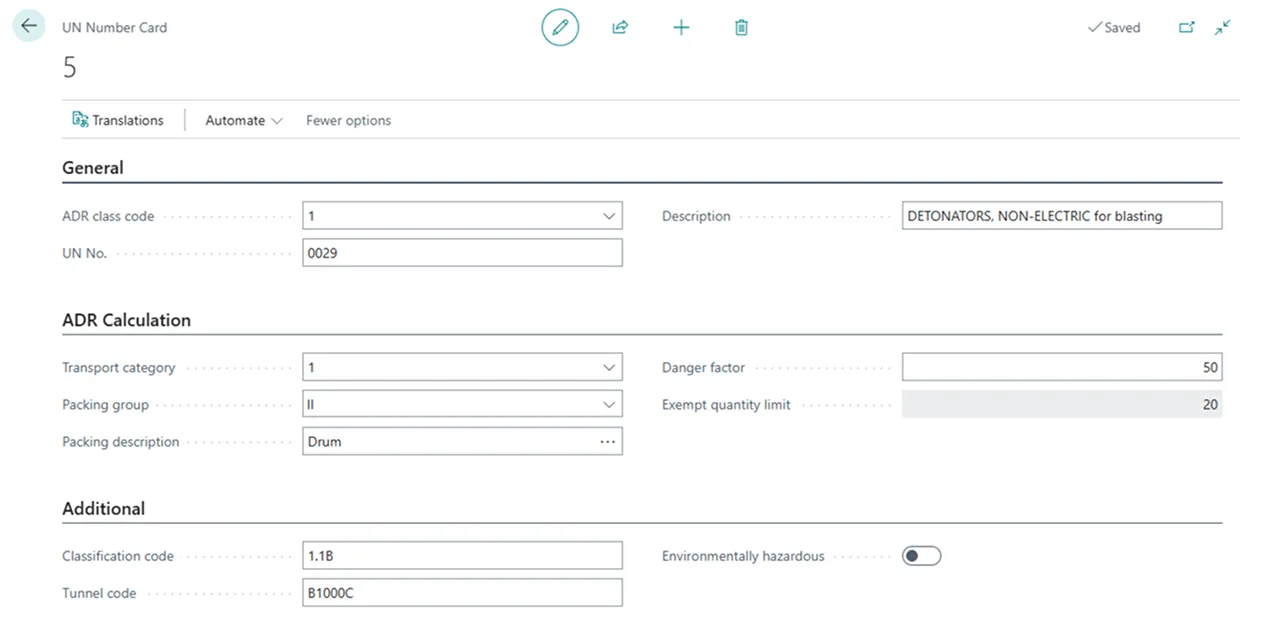
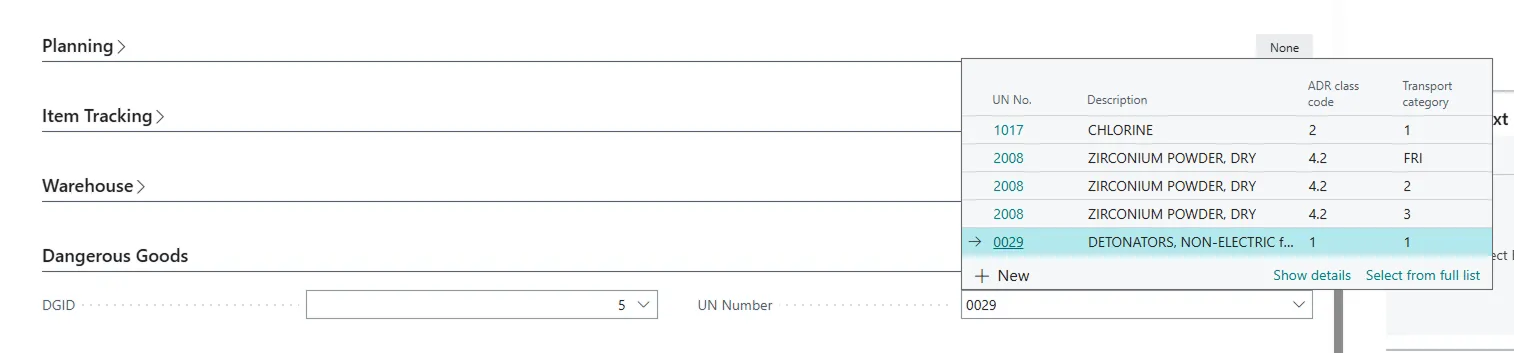
UN Numbers
Section titled “UN Numbers”Set up your UN Numbers along with all the data for that UN number this includes the ADR Class e.g. Explosive substances and articles (ADR Class 1)
The UN number card binds all of the above together on a single Card.
Once you have finished the setup of the UN numbers that you need to use in practice they can be connected to their respective items.
Dangerous Goods Extender for Shipment Connector
Section titled “Dangerous Goods Extender for Shipment Connector”This section details how to setup the Dangerous Goods Extender to function with one of our Shipment Connectors. Ensure that you have followed the first part of this guide before moving onto this section.
Shipping Agent Service Setup
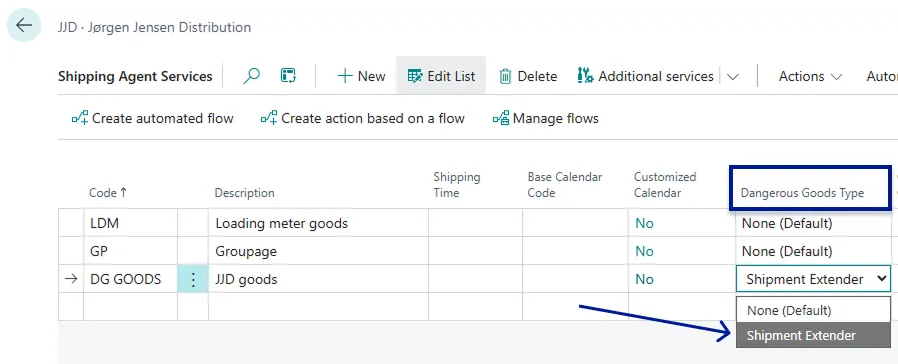
Section titled “Shipping Agent Service Setup”In order for Dangerous Goods data to be added with your shipments you need to firstly navigate to your Shipping Agent overview this can be done via the Shipment Settings page then you navigate from there to your Shipping Agent overview and further on to the Shipping Agent Service overview for that specific Shipping Agent. When you selected your Shipping agent service there is a field called Dangerous Goods Type. Set this field to Shipment Extender.
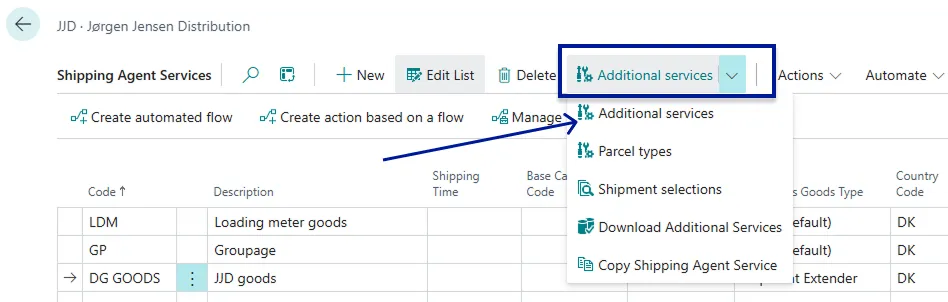
On the same shipping agent service page click the additional service button in the ribbon to open the additional services page for that specific shipping agent service.
Once this page has been opened Activate the Dangerous Goods service - for some carriers this can also be referred to as ADR.
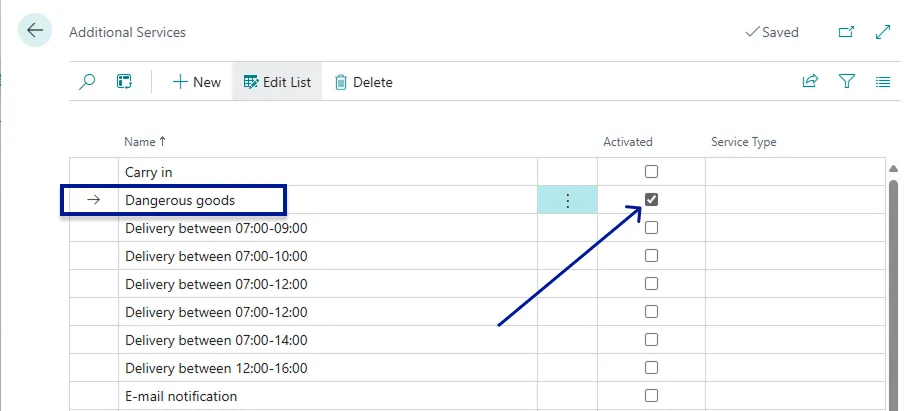 This needs to be activated in order for the Multi-Carrier Platform to create the ADR documents automatically for the carrier.
How-to use case
Section titled “How-to use case”Using the Dangerous goods app in conjunction with a Shipment Connector allows you to sent the Dangerous Goods information of items and UN numbers along with your Shipments. This is done once you have finished picking and getting ready to ship, just before shipping you navigate to the Waybill lines and click the Dangerous Goods button
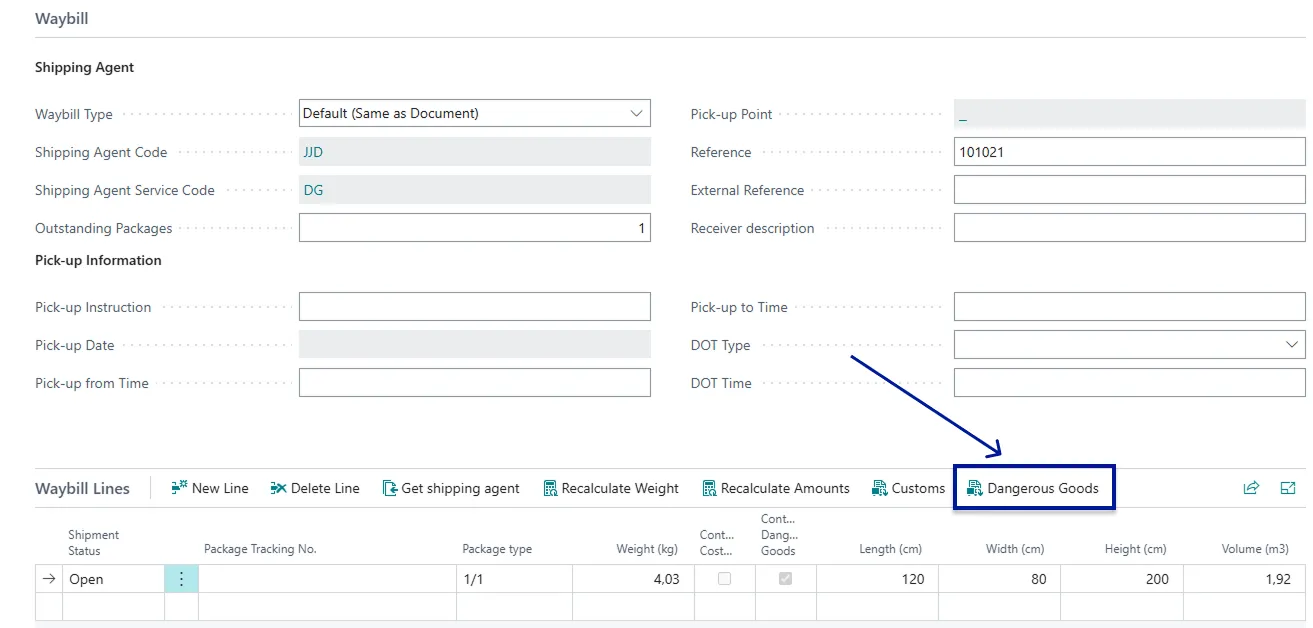
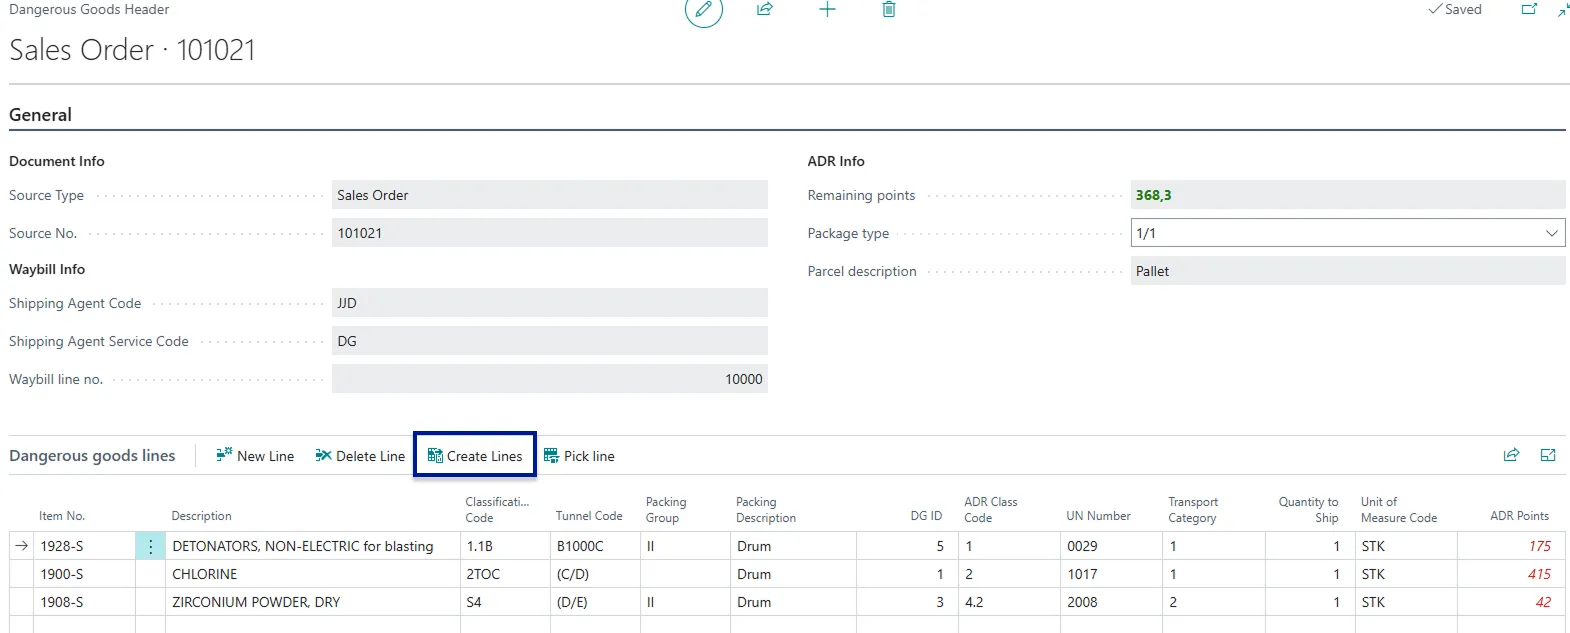
This opens the Dangerous Good Header page for the document with all relevant information present.
You can automatically generate all of the necessary dangerous goods information based on the items on the order and their accompanied UN numbers by clicking the Create Lines Button - you can also cherry pick certain lines by using the Pick Lines button instead.
Once that is done you can simply close the page and your shipment now contains the dangerous goods information and you can ship the shipment as per your usual process.